Klok
Klok
Klok
Table des matières
Inhaltsverzeichnis
Introduction
Klok est un logiciel de suivi du temps conçu pour les professionnels indépendants et les petites entreprises suisses — avocats, comptables, consultants, architectes, artisans.
Il fonctionne 100% en local, sans cloud, sans abonnement, sans Google, Microsoft ou Meta. Vos données restent sur votre machine, pour toujours.
Deux éditions
- Klok Standard — usage solo, une licence par poste de travail.
- Klok Team — plusieurs utilisateurs sur le même poste, chacun identifié à l'ouverture. Export multi-utilisateurs inclus.
time_tracking.db) dans son dossier d'installation. Aucune donnée n'est transmise à l'extérieur. Fonctionne sans connexion internet.
Einleitung
Klok ist eine Zeiterfassungssoftware für selbstständige Fachleute und kleine Schweizer Unternehmen — Anwälte, Buchhalter, Berater, Architekten, Handwerker.
Es funktioniert 100% lokal, ohne Cloud, ohne Abonnement, ohne Google, Microsoft oder Meta. Ihre Daten bleiben für immer auf Ihrem Gerät.
Zwei Editionen
- Klok Standard — Einzelnutzung, eine Lizenz pro Arbeitsplatz.
- Klok Team — mehrere Benutzer am selben Arbeitsplatz, jeder wird beim Start identifiziert. Multi-Benutzer-Export inklusive.
time_tracking.db) im Installationsordner. Es werden keine Daten nach außen übertragen. Funktioniert ohne Internetverbindung.
Introduction
Klok is a time tracking application designed for independent professionals and small Swiss businesses — lawyers, accountants, consultants, architects, tradespeople.
It runs 100% locally, with no cloud, no subscription, no Google, Microsoft or Meta. Your data stays on your machine, forever.
Two editions
- Klok Standard — single user, one licence per workstation.
- Klok Team — multiple users on the same workstation, each identified at launch. Multi-user export included.
time_tracking.db) in its installation folder. No data is ever transmitted externally. Works without an internet connection.
Installation & activation
Installation — Windows
- Téléchargez le fichier
Klok_2.0_win.exedepuis klokapp.ch. - Double-cliquez sur
install_klok.baten tant qu'administrateur. - L'installeur copie Klok dans
C:\Program Files\Klok\et crée un raccourci sur le Bureau.
Installation — macOS
- Téléchargez
Klok_2.0_mac.dmgdepuis klokapp.ch. - Double-cliquez sur
install_klok.command. - Klok est installé et un alias est créé dans le Dock.
Activation de la licence
Au premier démarrage sans fichier license.key, Klok affiche l'écran d'activation :
- Votre identifiant machine est affiché. Vous pouvez le copier via 📋 Copier l'identifiant.
- Cliquez sur 📧 Demander ma licence — votre messagerie s'ouvre avec un email pré-rempli adressé à license@klokapp.ch, contenant automatiquement votre identifiant machine, votre nom d'hôte et votre système d'exploitation.
- Envoyez l'email. Vous recevrez votre fichier
license.keysous 24h. - Placez
license.keydans le même dossier queKlok.exe. - Relancez Klok. L'application s'ouvre normalement.
Structure des fichiers
Klok.exe/Klok.app— application principalelicense.key— clé d'activation (à placer ici)time_tracking.db— base de données (créée au premier lancement)clients.txt— liste de vos clientssettings.json— préférences (langue)users.txt— liste des utilisateurs (Klok Team uniquement)
Installation & Aktivierung
Installation — Windows
- Laden Sie
Klok_2.0_win.exevon klokapp.ch herunter. - Doppelklicken Sie auf
install_klok.batals Administrator. - Das Installationsprogramm kopiert Klok nach
C:\Program Files\Klok\und erstellt eine Desktop-Verknüpfung.
Installation — macOS
- Laden Sie
Klok_2.0_mac.dmgvon klokapp.ch herunter. - Doppelklicken Sie auf
install_klok.command. - Klok wird installiert und ein Alias im Dock erstellt.
Lizenzaktivierung
Beim ersten Start ohne license.key zeigt Klok den Aktivierungsbildschirm:
- Ihre Geräte-ID wird angezeigt. Kopieren Sie sie mit 📋 ID kopieren.
- Klicken Sie auf 📧 Lizenz anfordern — Ihr E-Mail-Programm öffnet sich mit einer vorausgefüllten Nachricht an license@klokapp.ch, die automatisch Ihre Geräte-ID, Ihren Hostnamen und Ihr Betriebssystem enthält.
- Senden Sie die E-Mail. Sie erhalten Ihre
license.key-Datei innerhalb von 24 Stunden. - Legen Sie
license.keyin denselben Ordner wieKlok.exe. - Starten Sie Klok neu. Die Anwendung öffnet sich normal.
Dateistruktur
Klok.exe/Klok.app— Hauptanwendunglicense.key— Aktivierungsschlüssel (hier ablegen)time_tracking.db— Datenbank (beim ersten Start erstellt)clients.txt— Ihre Kundenlistesettings.json— Einstellungen (Sprache)users.txt— Benutzerliste (nur Klok Team)
Installation & activation
Installation — Windows
- Download
Klok_2.0_win.exefrom klokapp.ch. - Double-click
install_klok.batas administrator. - The installer copies Klok to
C:\Program Files\Klok\and creates a Desktop shortcut.
Installation — macOS
- Download
Klok_2.0_mac.dmgfrom klokapp.ch. - Double-click
install_klok.command. - Klok is installed and an alias is created in the Dock.
Licence activation
On first launch without a license.key file, Klok shows the activation screen:
- Your machine ID is displayed. Copy it using 📋 Copy ID.
- Click 📧 Request my licence — your email client opens with a pre-filled message to license@klokapp.ch, automatically including your machine ID, hostname and operating system.
- Send the email. You will receive your
license.keyfile within 24 hours. - Place
license.keyin the same folder asKlok.exe. - Relaunch Klok. The application opens normally.
File structure
Klok.exe/Klok.app— main applicationlicense.key— activation key (place it here)time_tracking.db— database (created on first launch)clients.txt— your client listsettings.json— preferences (language)users.txt— user list (Klok Team only)
Première ouverture
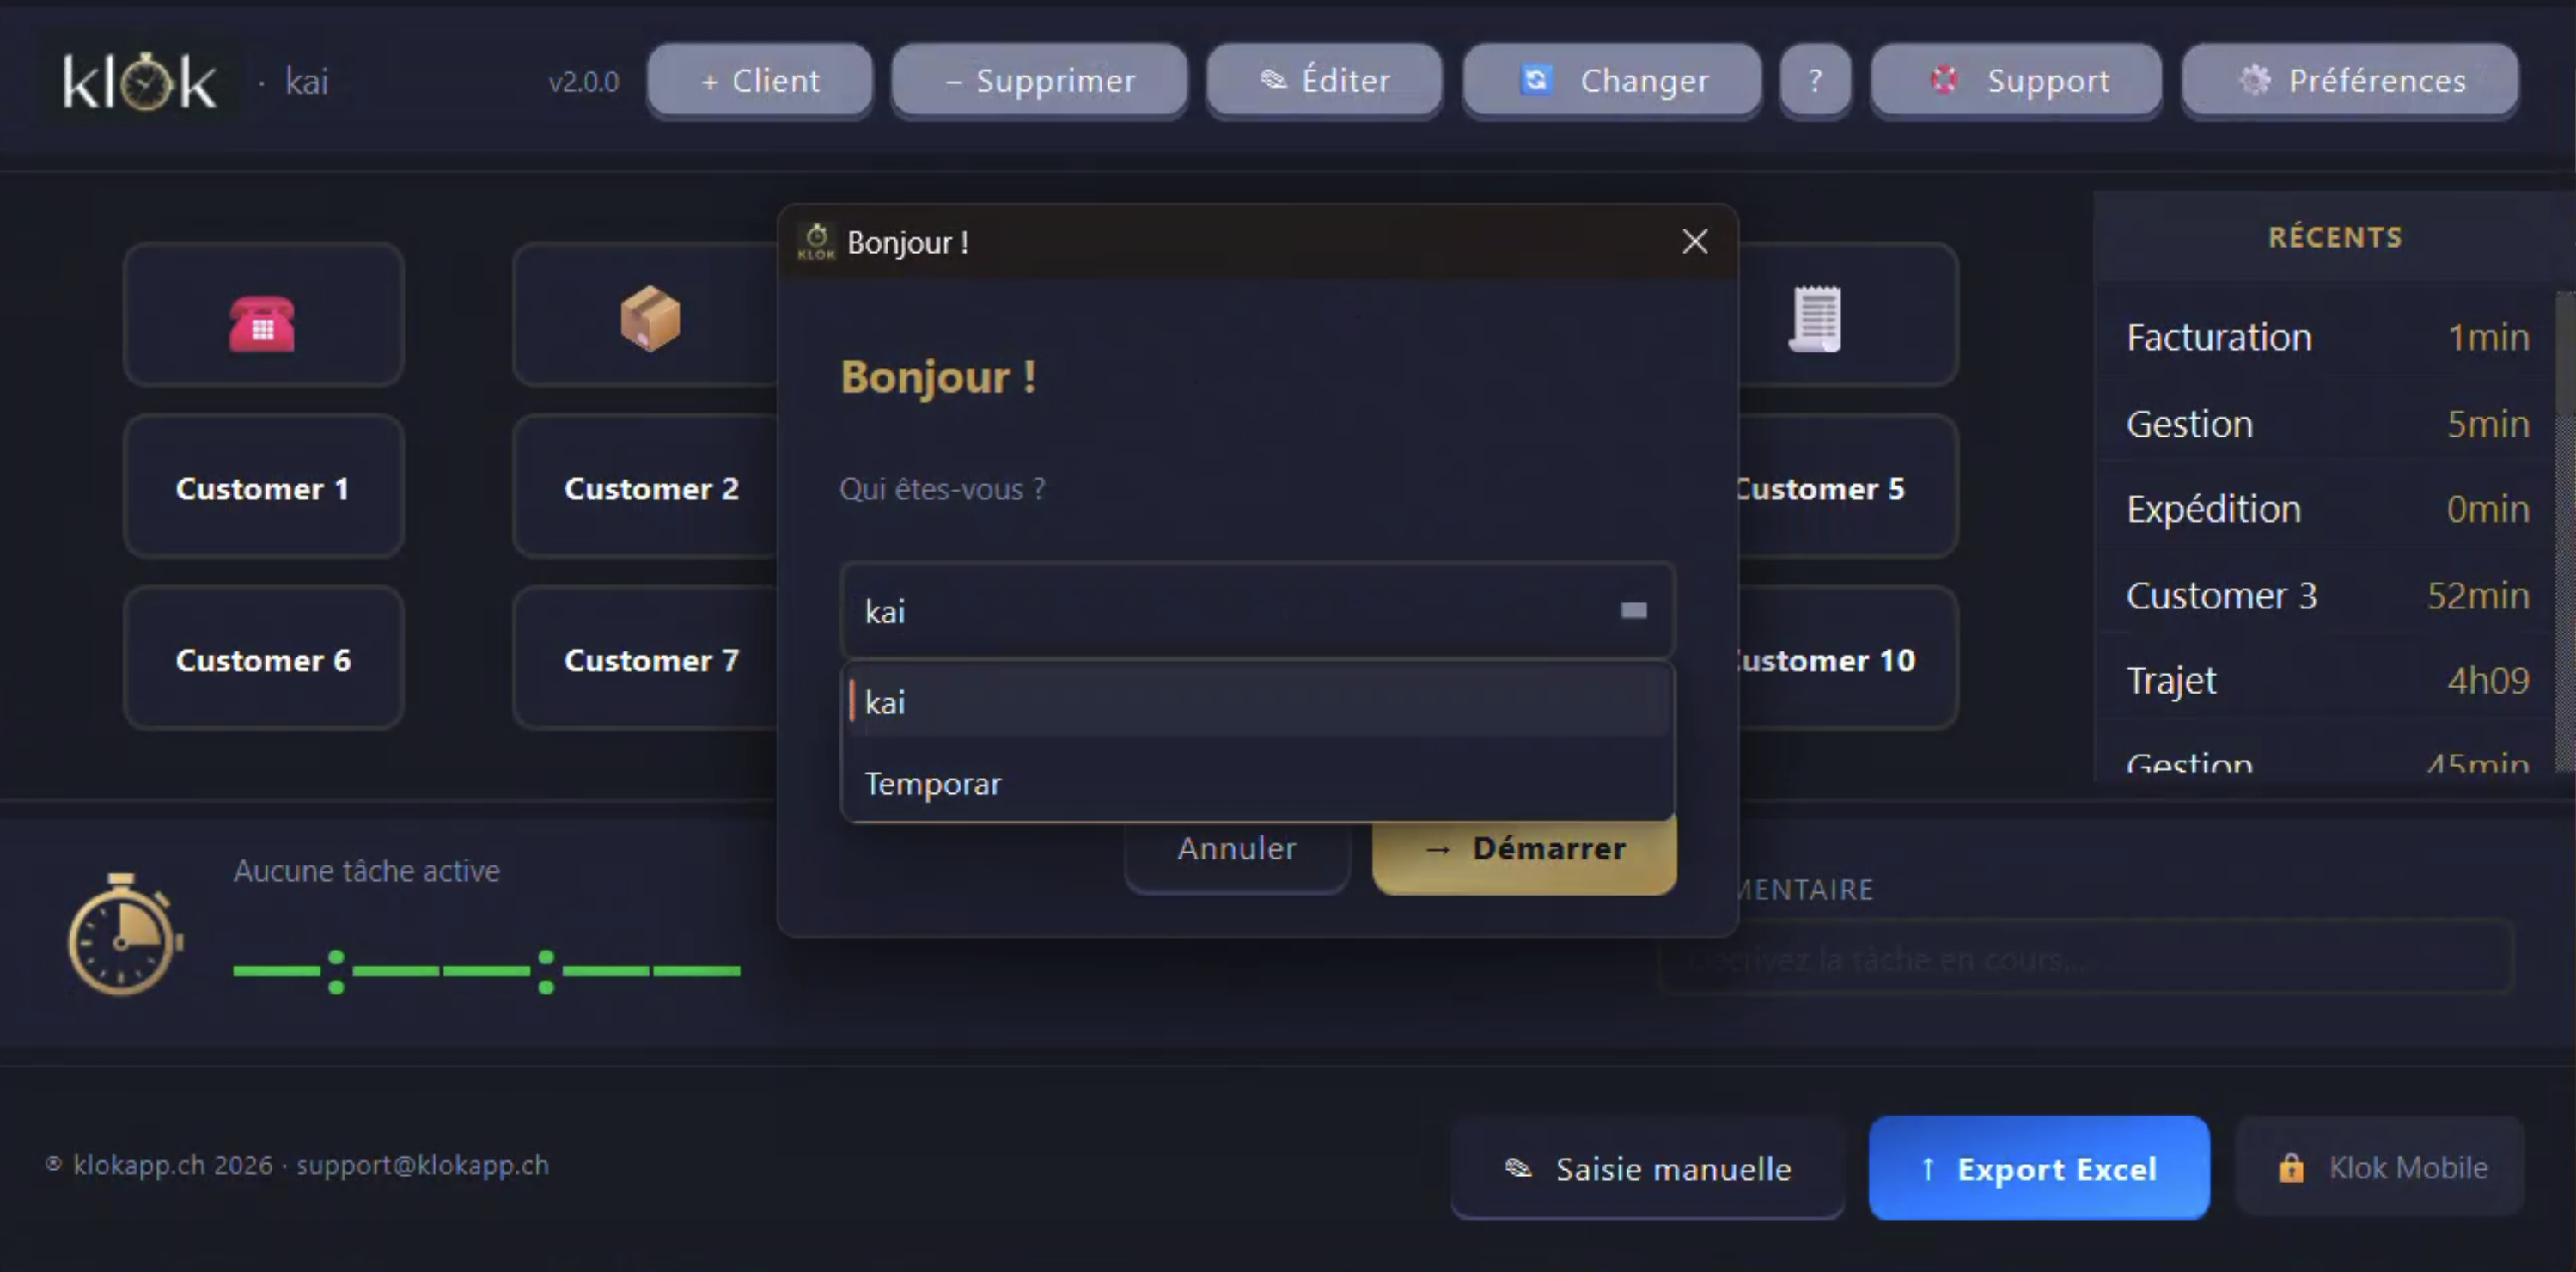
Klok détecte automatiquement la langue de votre système d'exploitation et l'utilise par défaut. Vous pouvez la modifier à tout moment dans les Préférences.
Au démarrage, une fenêtre vous demande qui vous êtes. Sélectionnez votre nom dans la liste ou ajoutez-le si vous êtes un nouvel utilisateur. Cliquez → Démarrer.
Votre nom s'affiche dans la barre de titre : Klok — Prénom Nom.
Erster Start
Klok erkennt automatisch die Sprache Ihres Betriebssystems und verwendet diese als Standard. Sie können die Sprache jederzeit in den Einstellungen ändern.
Beim Start fragt ein Fenster wer Sie sind. Wählen Sie Ihren Namen aus der Liste oder fügen Sie ihn hinzu. Klicken Sie → Starten.
Ihr Name erscheint in der Titelleiste: Klok — Vorname Nachname.
First launch
Klok automatically detects your operating system language and uses it as the default. You can change it at any time in Preferences.
At startup, a window asks who you are. Select your name from the list or add it if you are a new user. Click → Start.
Your name is displayed in the title bar: Klok — First Last.
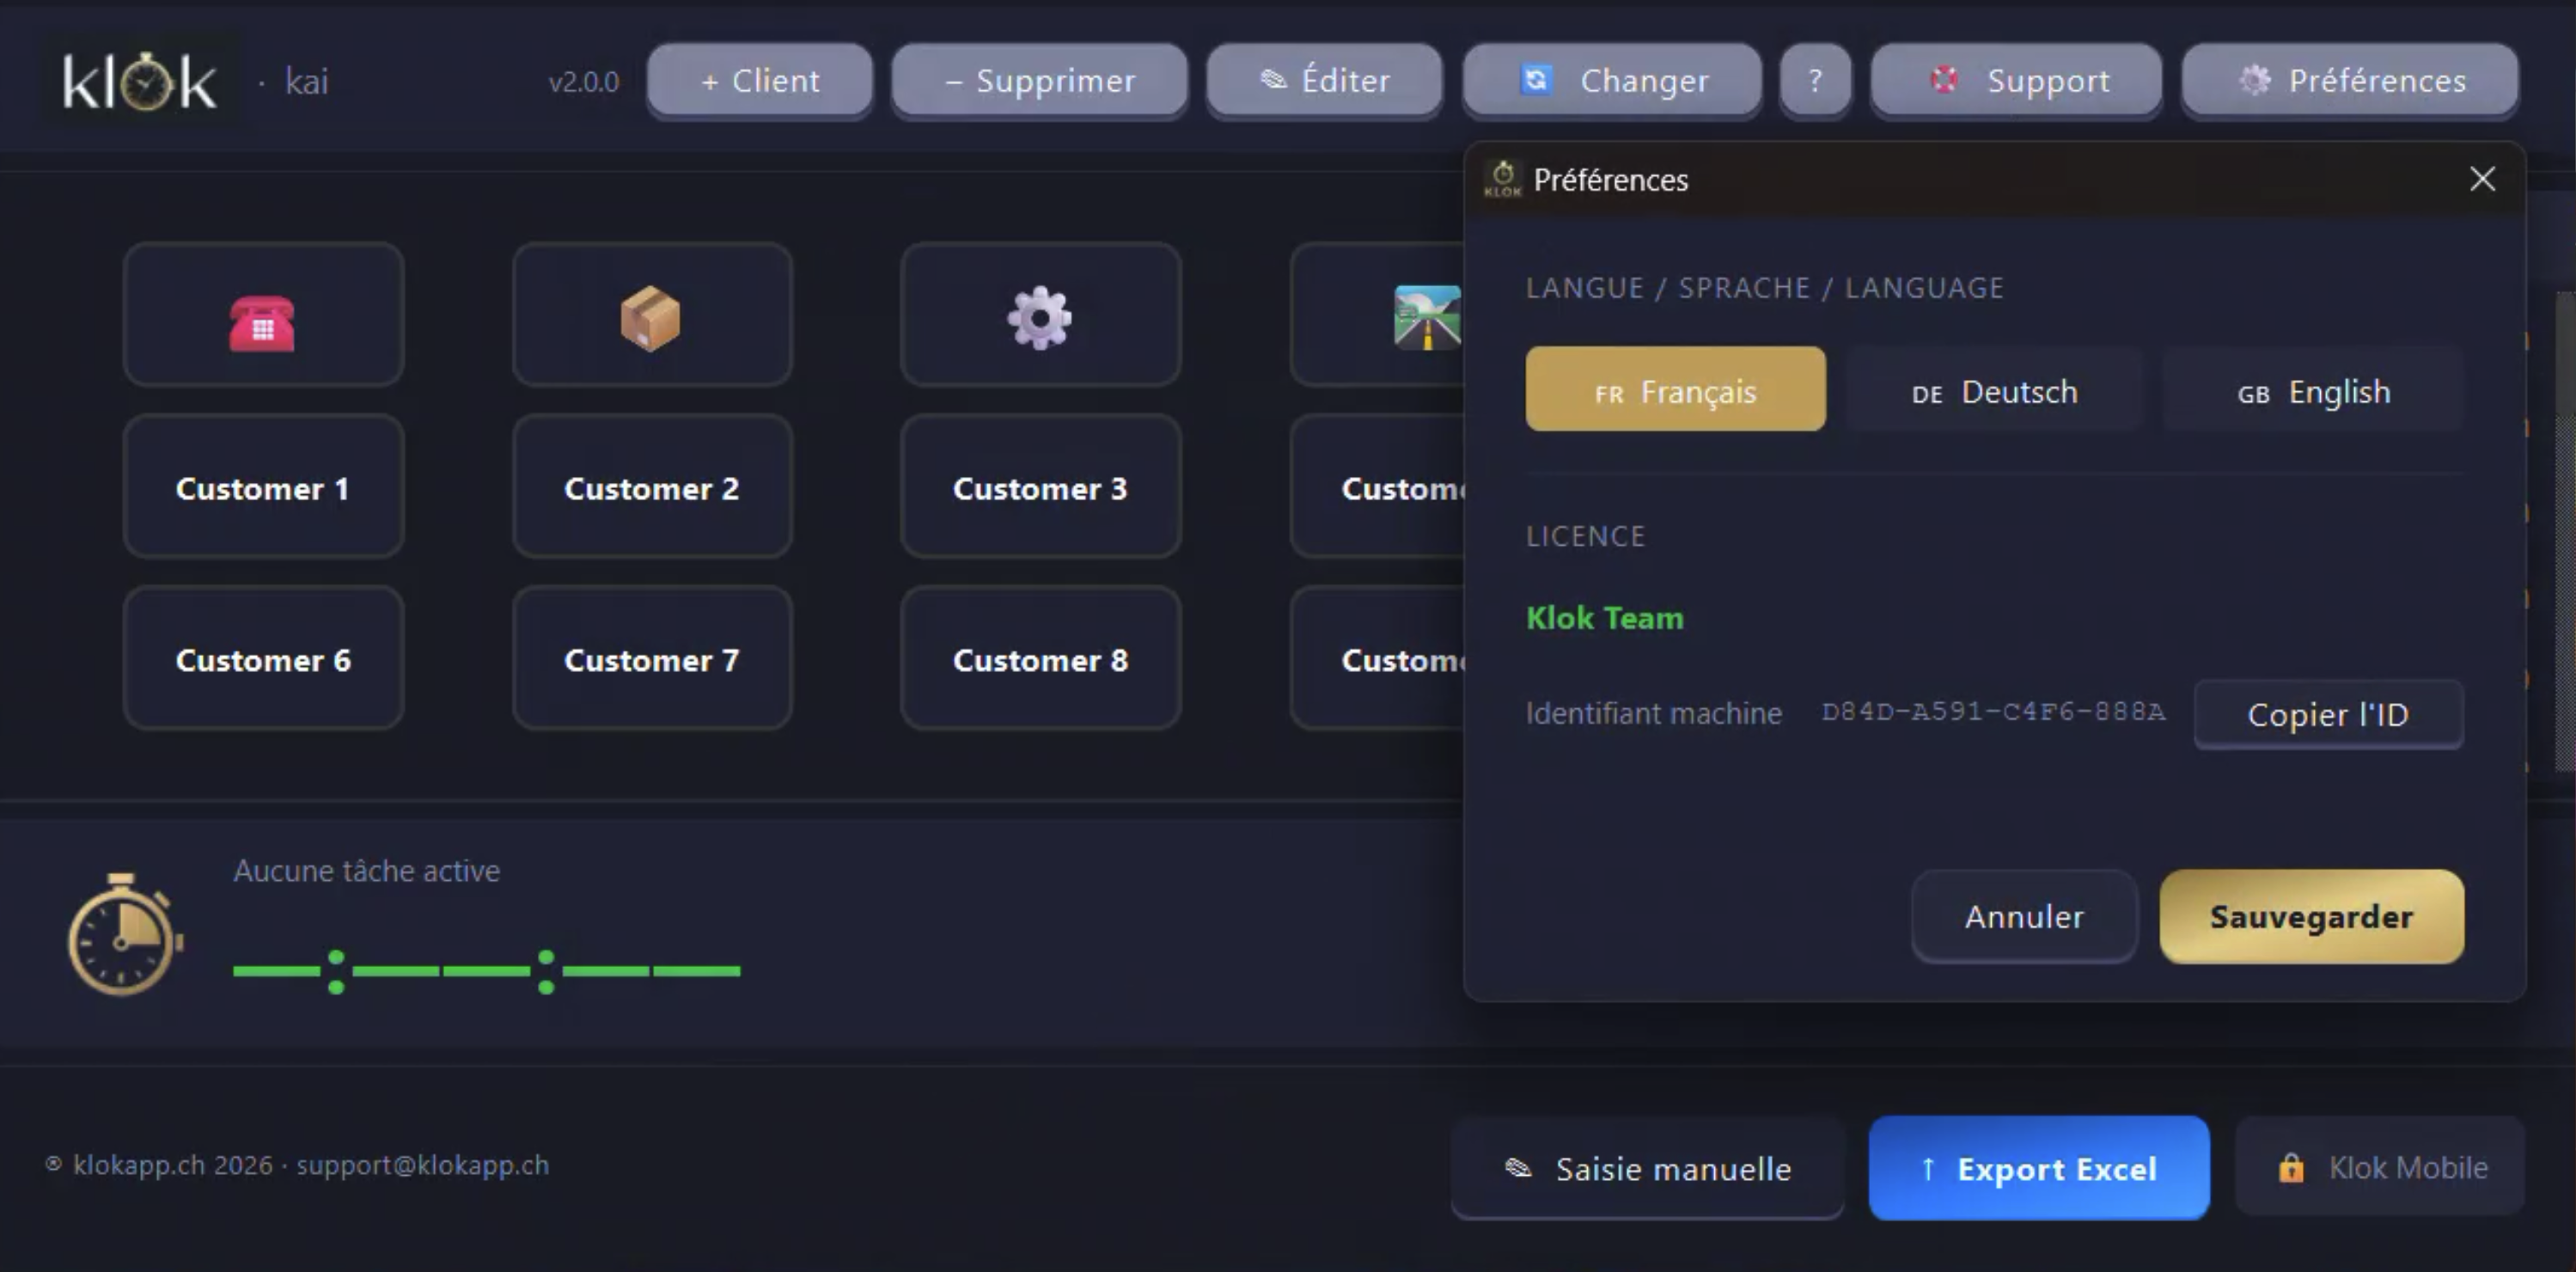
Interface principale
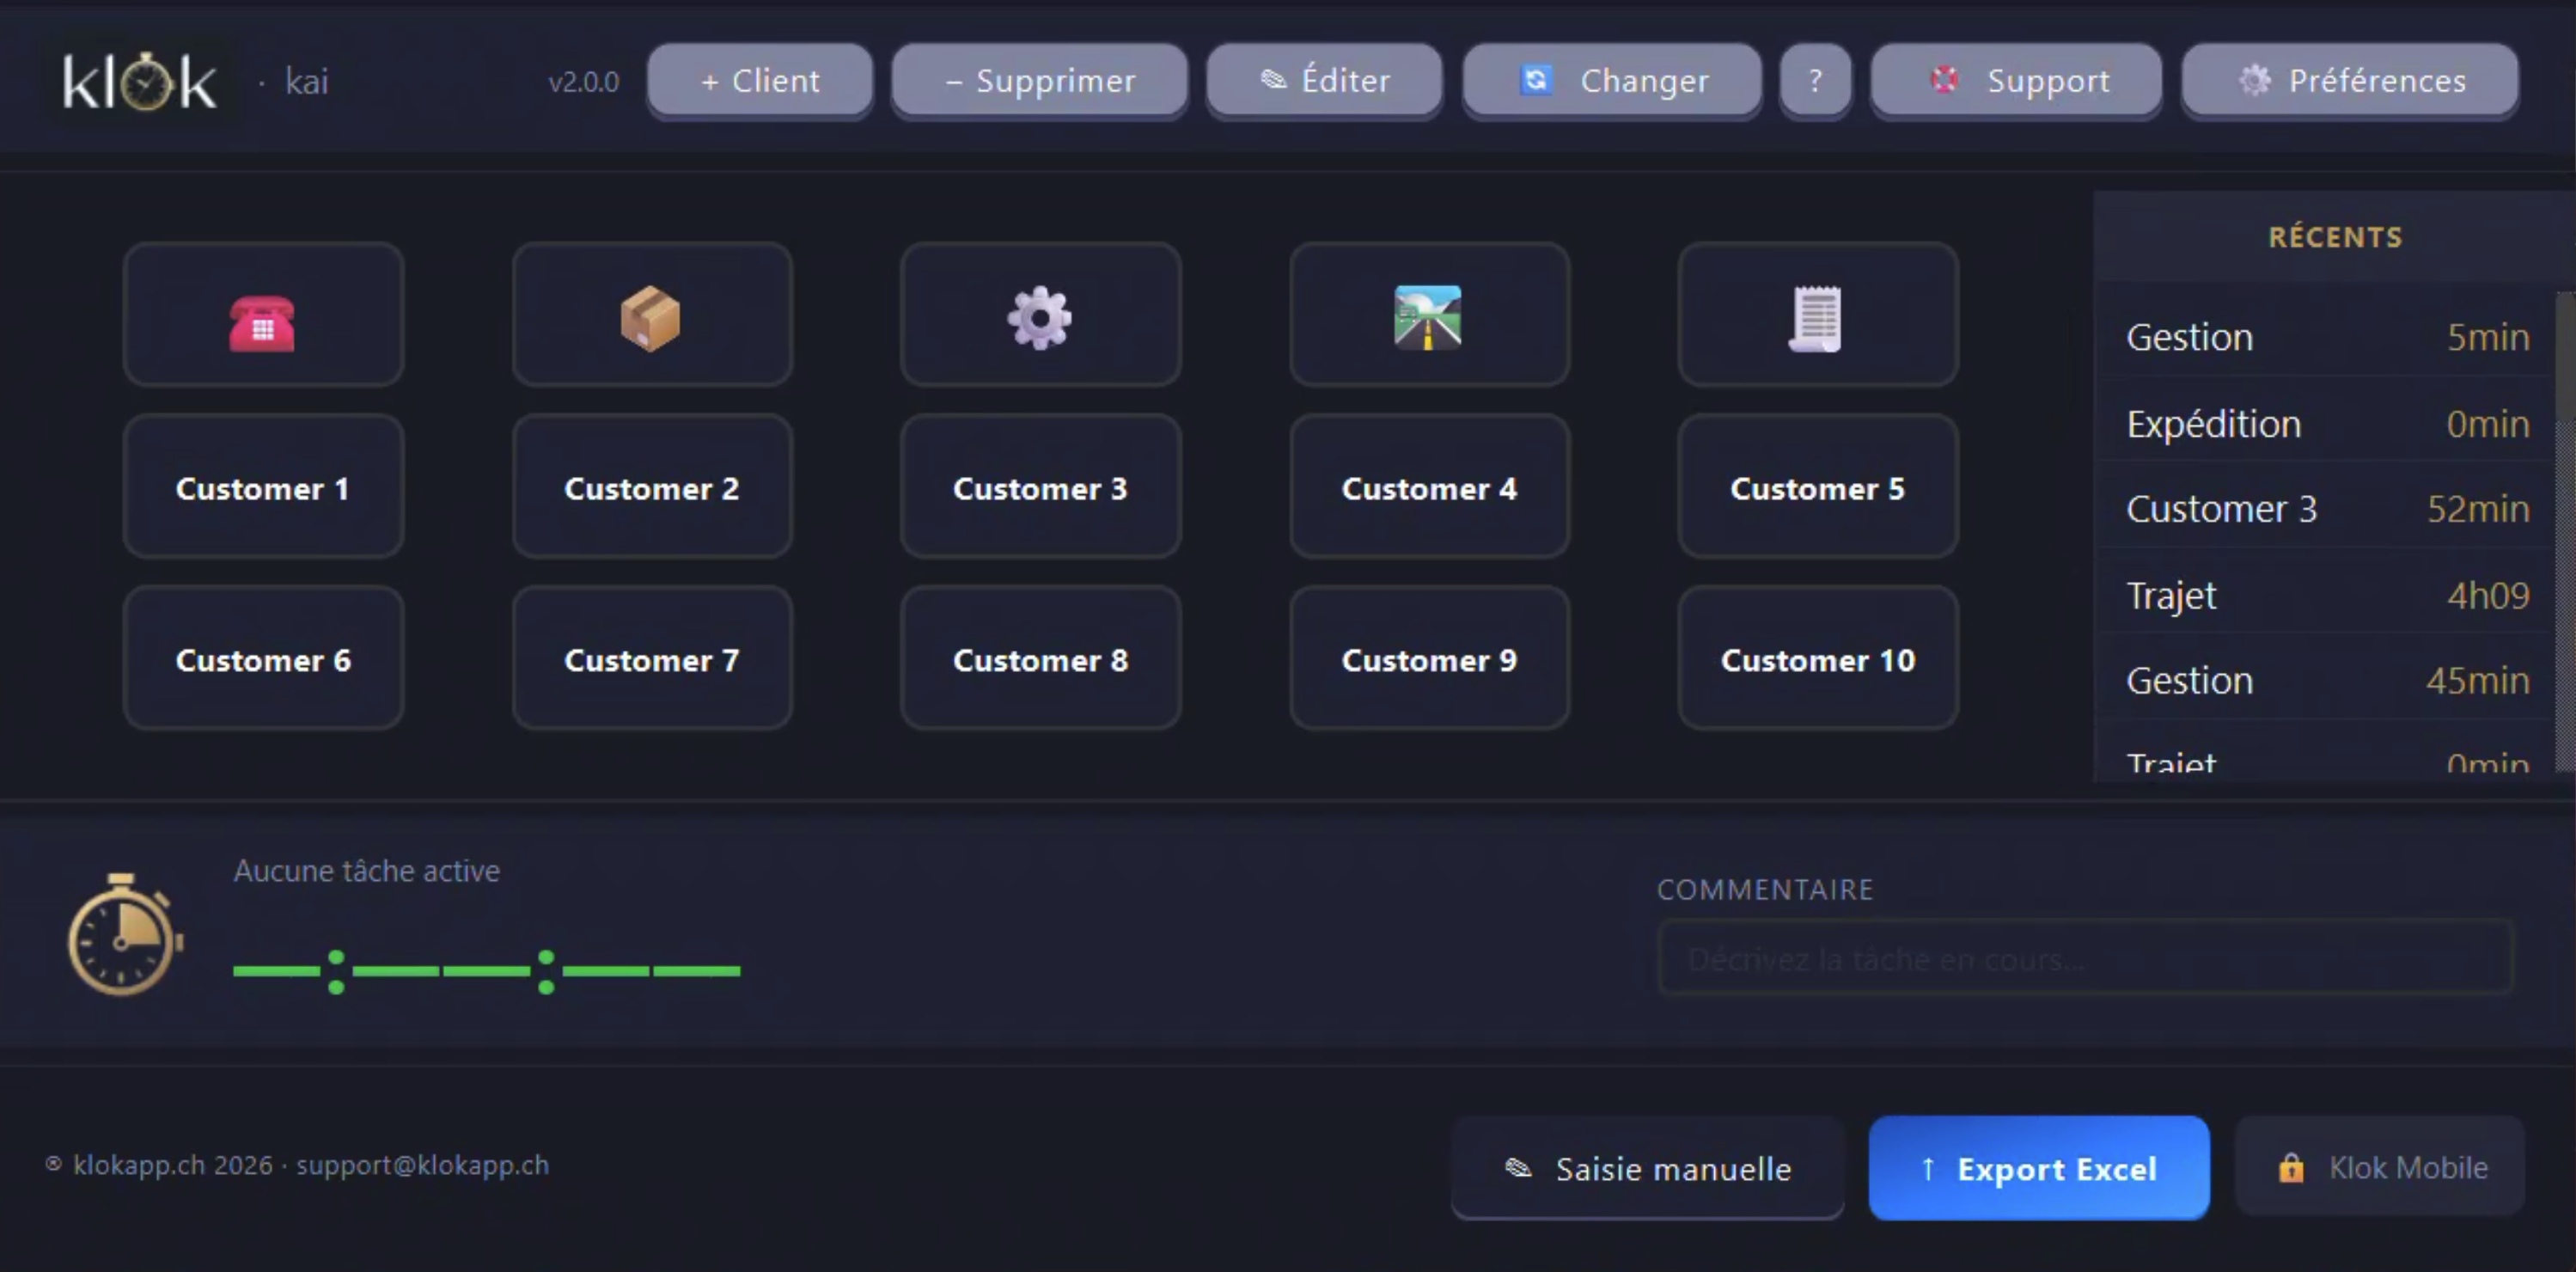
La fenêtre principale est divisée en cinq zones :
- Barre d'en-tête — logo, version, nom de l'utilisateur actif, boutons de gestion.
- Grille des clients — 5 colonnes, boutons colorés avec icônes. Cliquez pour démarrer ou arrêter le timer.
- Panneau Récents — à droite de la grille, affiche les 20 dernières sessions (client + durée).
- Barre du timer — client actif, chronomètre en temps réel, champ commentaire.
- Barre d'actions — ® klokapp.ch (coin gauche) · Saisie manuelle · Export Excel · 📱 Klok Mobile.
Boutons de l'en-tête
- + Client — ajouter un client
- − Supprimer — supprimer un client
- ✎ Éditer — ouvrir la liste des clients dans l'éditeur de texte
- 🔄 Changer — changer d'utilisateur (Klok Team)
- 🛟 Support — accès au support et télémaintenance SOS
- ⚙ Préférences — langue et informations de licence
Grille des clients
Les boutons sont organisés en 5 colonnes, chacune avec sa propre couleur. Les boutons de la première ligne affichent une icône représentant le type d'activité. Au-delà de 15 boutons, une barre de défilement apparaît automatiquement.
Hauptoberfläche
Das Hauptfenster ist in fünf Bereiche unterteilt:
- Kopfzeile — Logo, Version, aktiver Benutzername, Verwaltungsschaltflächen.
- Kundenraster — 5 Spalten, farbige Schaltflächen mit Symbolen. Klicken zum Starten/Stoppen.
- Zuletzt-Panel — rechts vom Raster, zeigt die letzten 20 Sitzungen (Kunde + Dauer).
- Timer-Leiste — aktiver Kunde, Echtzeit-Stoppuhr, Kommentarfeld.
- Aktionsleiste — ® klokapp.ch (links) · Manuelle Eingabe · Excel-Export · 📱 Klok Mobile.
Kopfzeilen-Schaltflächen
- + Kunde — Kunden hinzufügen
- − Entfernen — Kunden entfernen
- ✎ Bearbeiten — Kundenliste im Texteditor öffnen
- 🔄 Wechseln — Benutzer wechseln (Klok Team)
- 🛟 Support — Support und SOS-Fernwartung
- ⚙ Einstellungen — Sprache und Lizenzinformationen
Kundenraster
Die Schaltflächen sind in 5 Spalten mit je eigener Farbe angeordnet. Schaltflächen der ersten Zeile zeigen ein Symbol. Bei mehr als 15 Schaltflächen erscheint automatisch eine Scrollleiste.
Main interface
The main window is divided into five zones:
- Header bar — logo, version, active username, management buttons.
- Client grid — 5 columns, coloured buttons with icons. Click to start or stop the timer.
- Recent panel — to the right of the grid, shows the last 20 sessions (client + duration).
- Timer bar — active client, real-time stopwatch, comment field.
- Action bar — ® klokapp.ch (bottom-left) · Manual entry · Excel export · 📱 Klok Mobile.
Header buttons
- + Client — add a client
- − Remove — delete a client
- ✎ Edit — open the client list in a text editor
- 🔄 Switch — switch user (Klok Team)
- 🛟 Support — access support and SOS remote assistance
- ⚙ Preferences — language and licence information
Client grid
Buttons are arranged in 5 colour-coded columns. First-row buttons display an activity icon. Beyond 15 buttons, a scroll bar appears automatically.
Gestion des clients
Ajouter un client
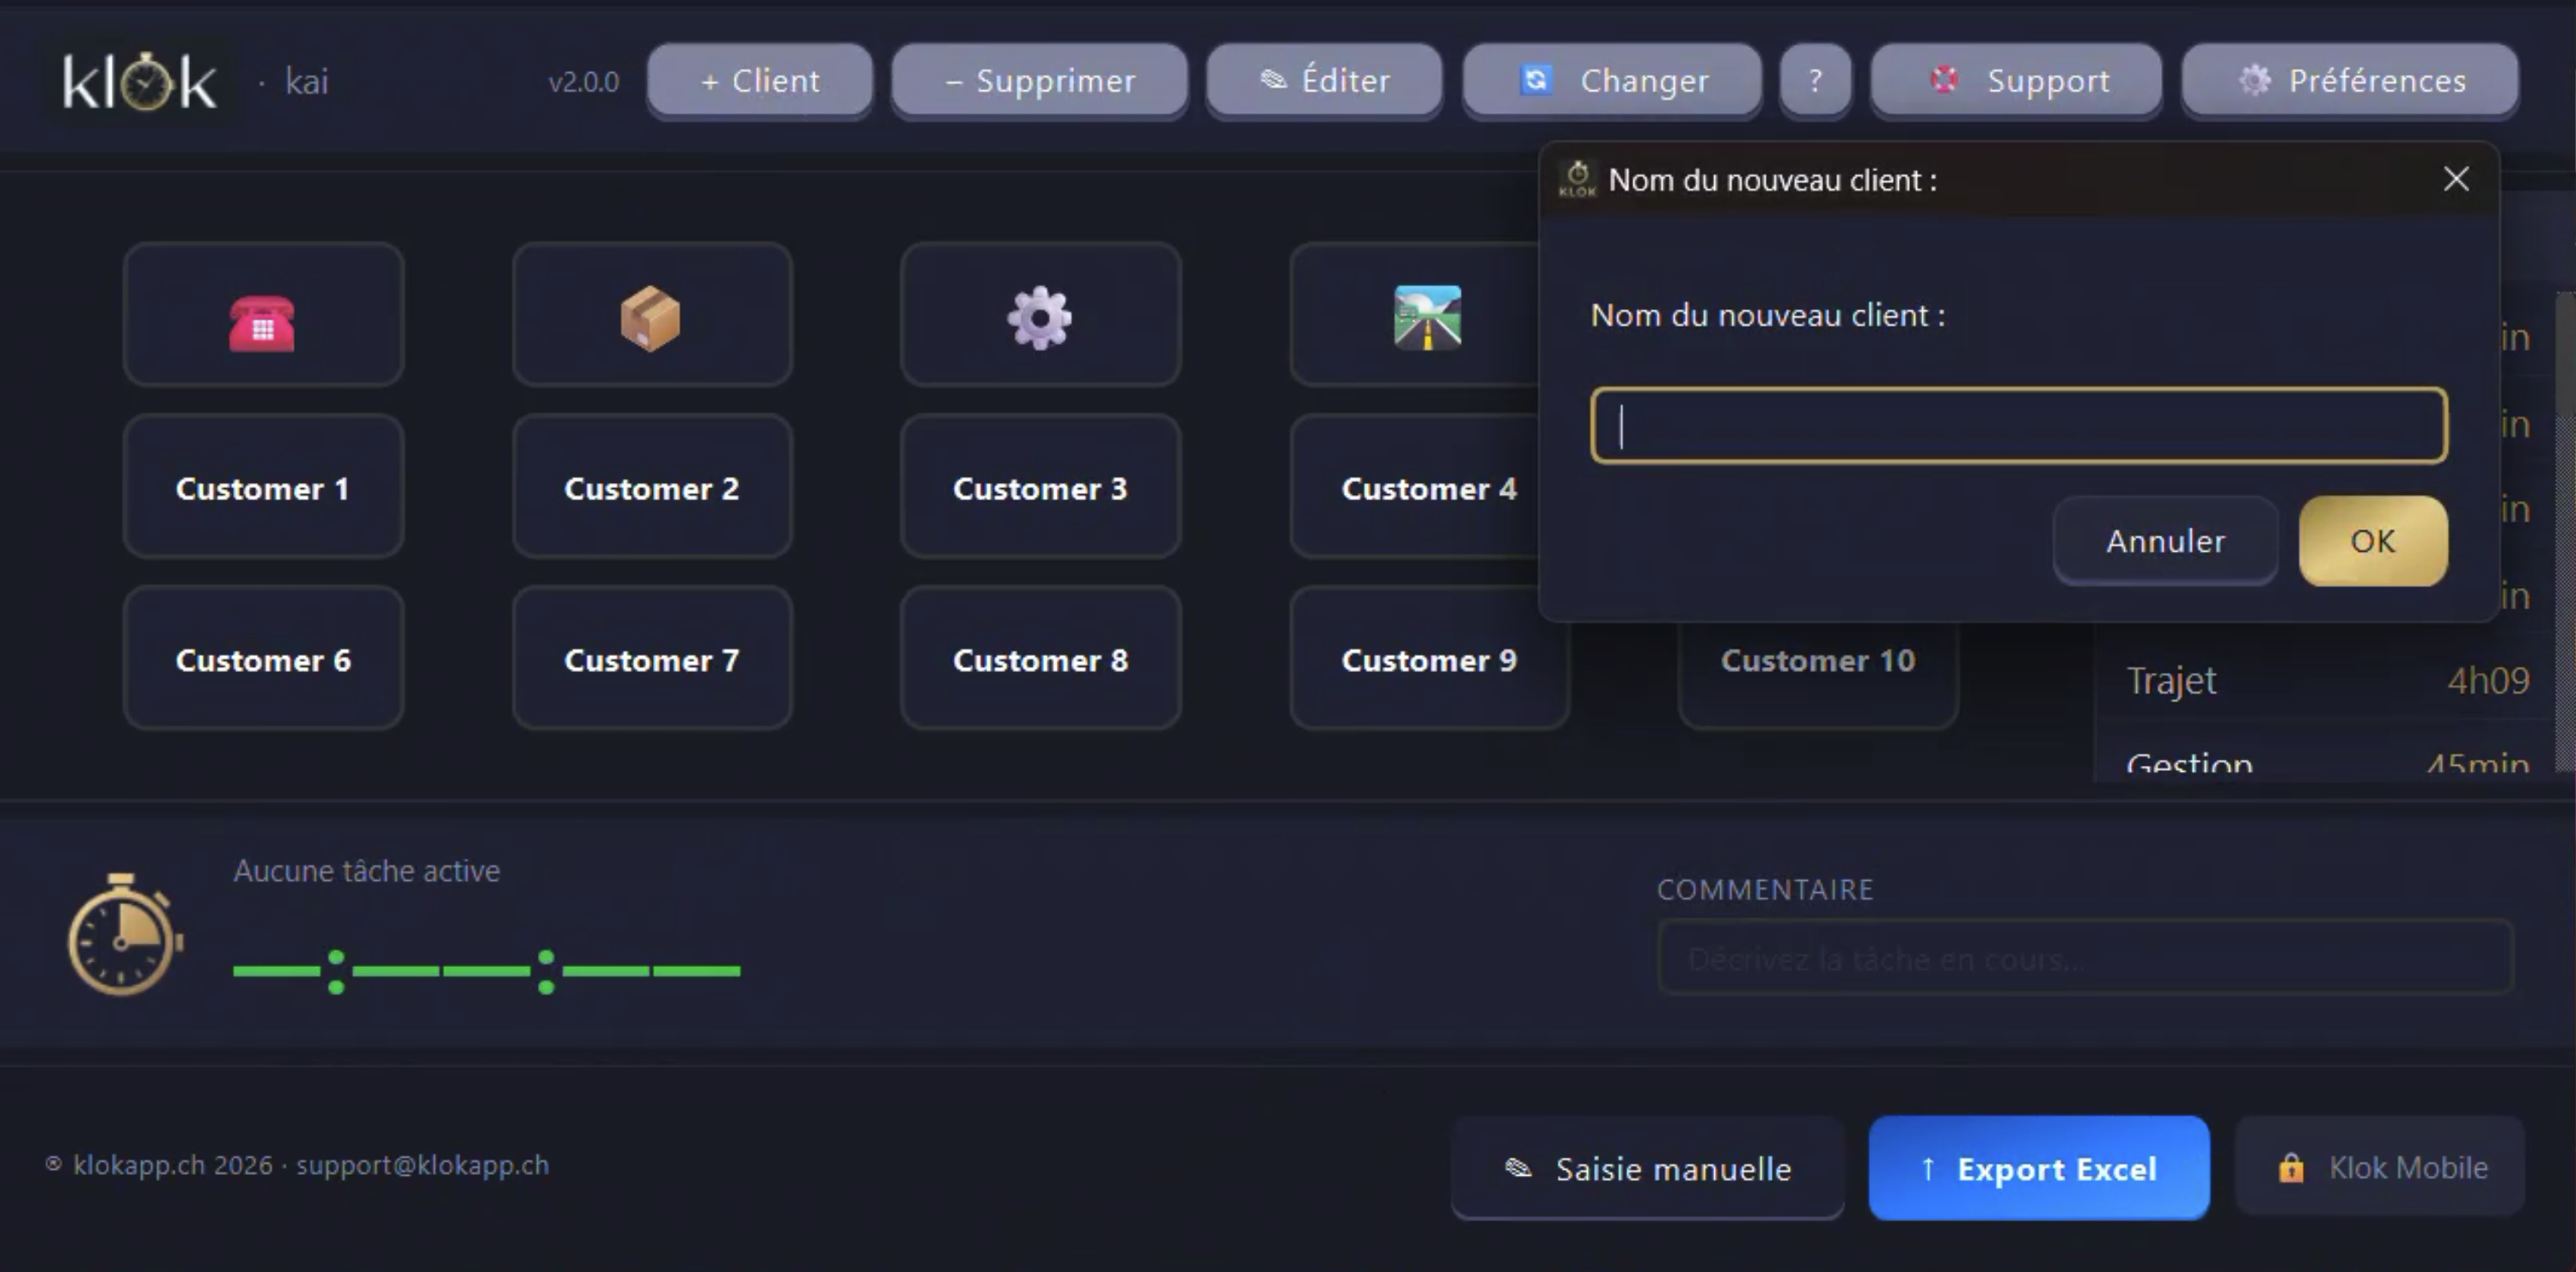
- Cliquez sur + Client dans l'en-tête.
- Saisissez le nom ou l'abréviation du client.
- Confirmez. Le bouton apparaît immédiatement dans la grille.
Supprimer un client
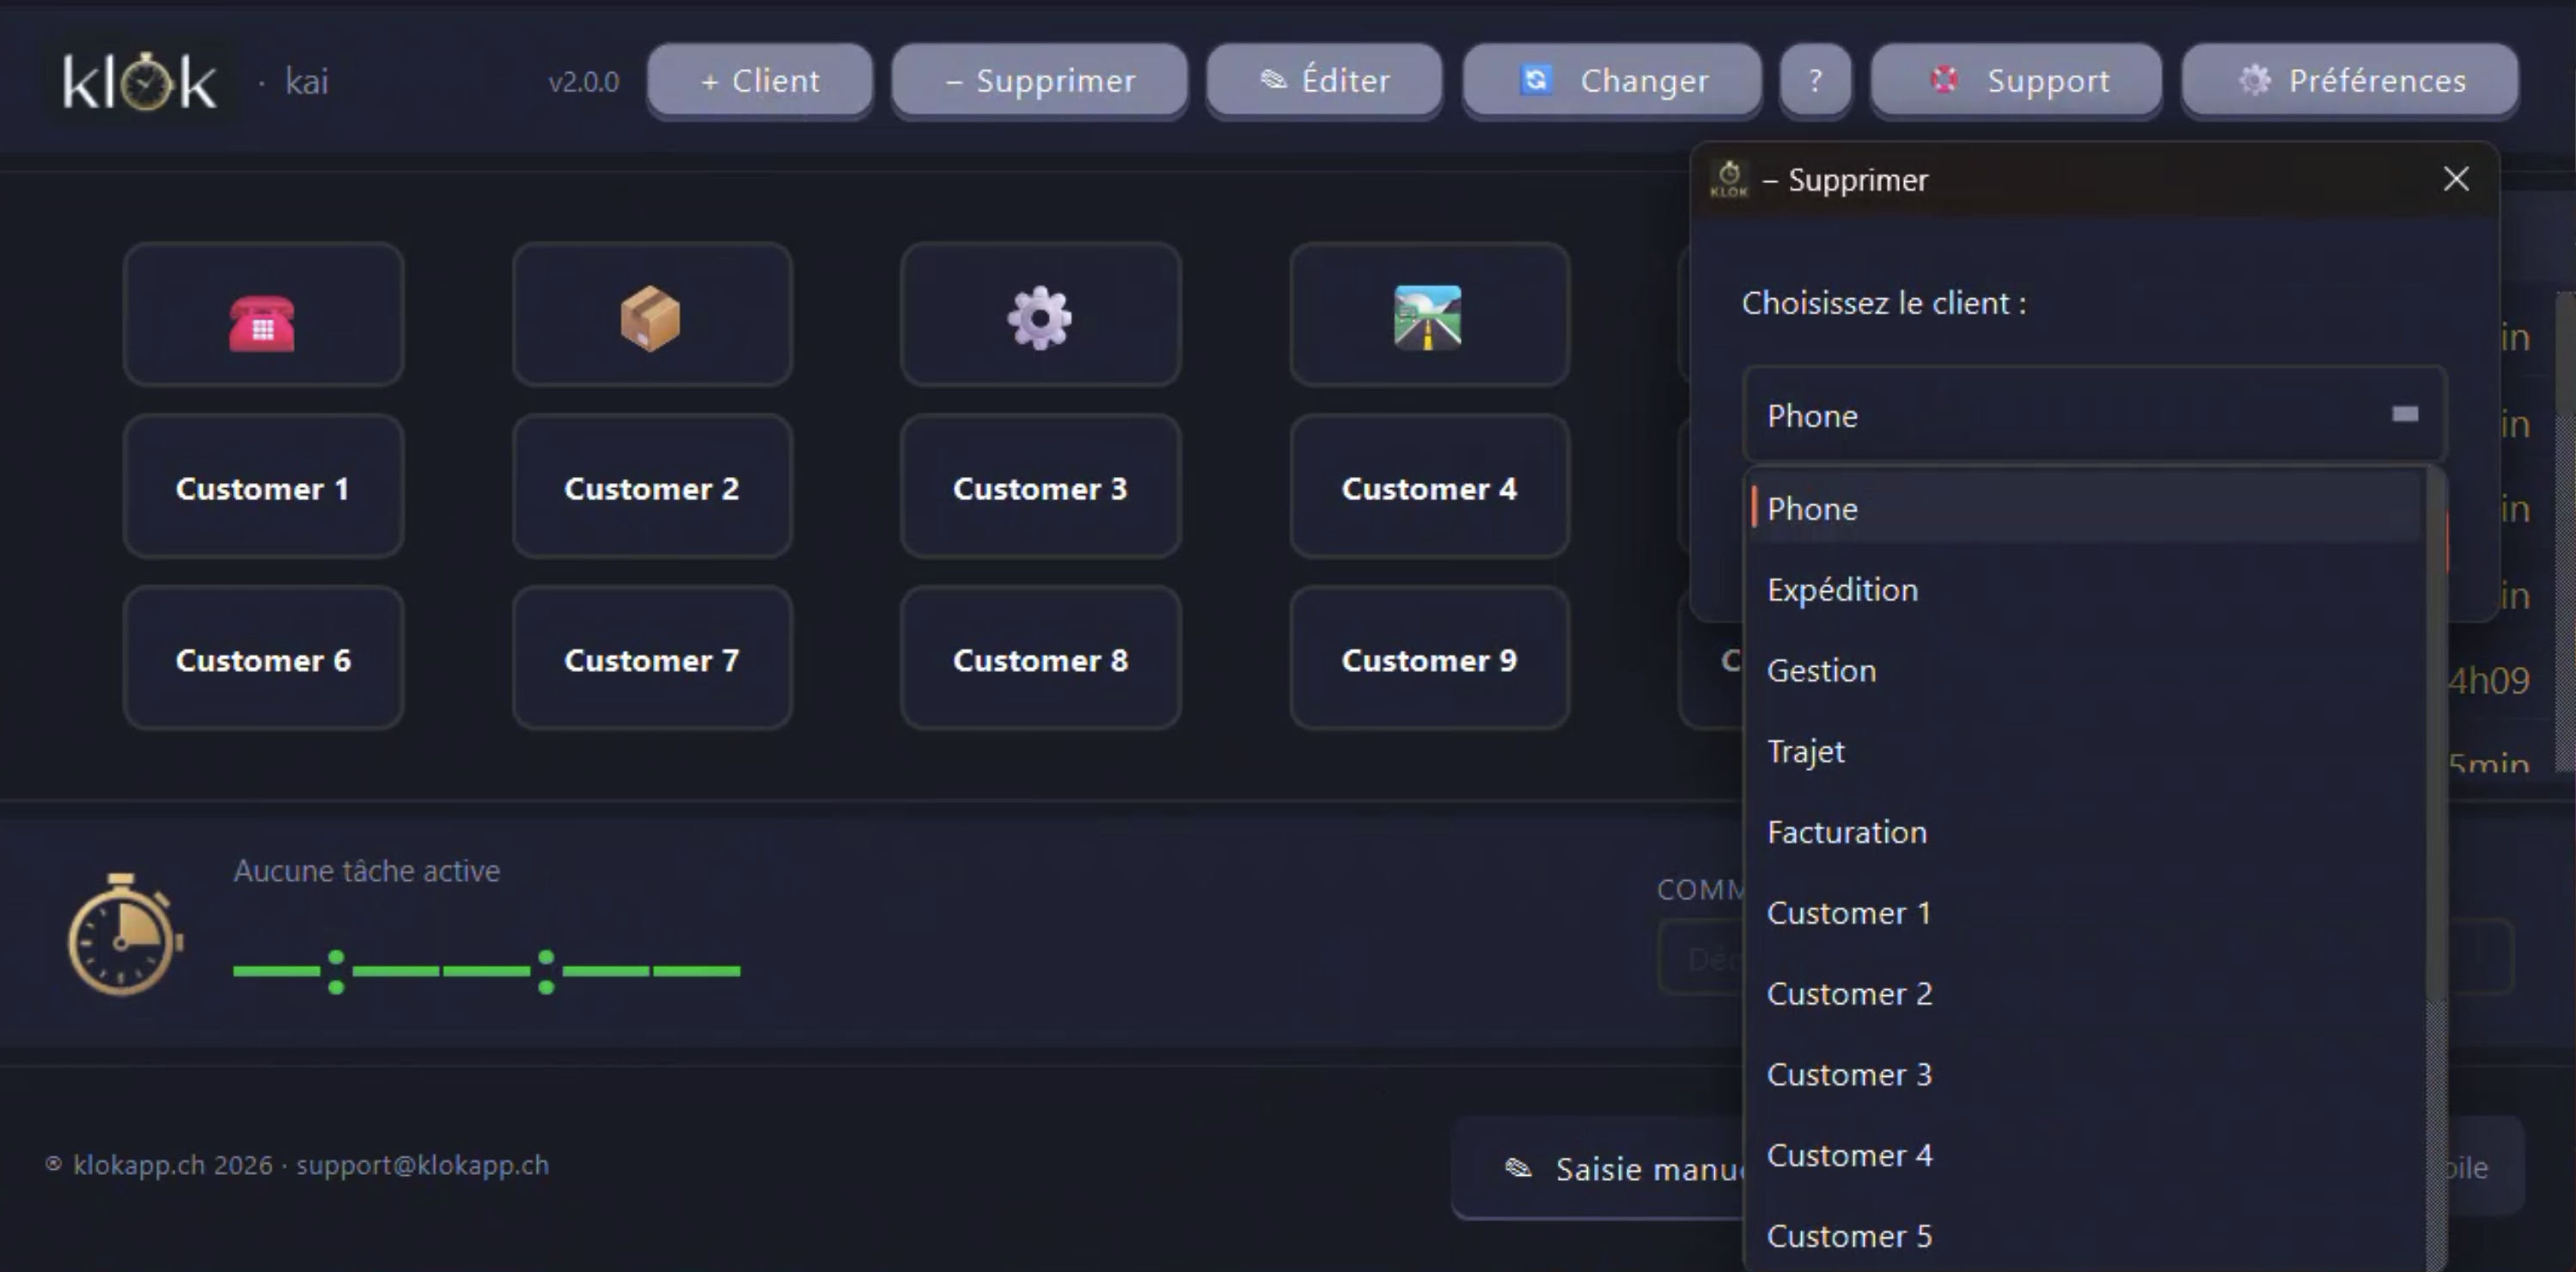
- Cliquez sur − Supprimer.
- Sélectionnez le client dans la liste déroulante.
- Confirmez. Les données enregistrées pour ce client sont conservées.
Éditer la liste complète
Le bouton ✎ Éditer ouvre le fichier clients.txt dans votre éditeur de texte. Modifiez la liste (un client par ligne), sauvegardez, puis cliquez OK dans la boîte de dialogue Klok.
CAP, MUELL, SMC.
Kundenverwaltung
Kunden hinzufügen
- Klicken Sie auf + Kunde in der Kopfzeile.
- Geben Sie den Namen oder die Abkürzung des Kunden ein.
- Bestätigen. Die Schaltfläche erscheint sofort im Raster.
Kunden entfernen
- Klicken Sie auf − Entfernen.
- Wählen Sie den Kunden aus der Dropdown-Liste.
- Bestätigen. Gespeicherte Daten für diesen Kunden bleiben erhalten.
Vollständige Liste bearbeiten
Die Schaltfläche ✎ Bearbeiten öffnet clients.txt in Ihrem Texteditor. Bearbeiten Sie die Liste (ein Kunde pro Zeile), speichern und klicken Sie in Klok auf OK.
CAP, MUELL, SMC.
Client management
Add a client
- Click + Client in the header.
- Enter the client name or abbreviation.
- Confirm. The button appears immediately in the grid.
Remove a client
- Click − Remove.
- Select the client from the dropdown list.
- Confirm. Recorded data for this client is preserved.
Edit the full list
The ✎ Edit button opens clients.txt in your text editor. Edit the list (one client per line), save, then click OK in the Klok dialog.
CAP, MUELL, SMC.
Suivi du temps
Démarrer un timer
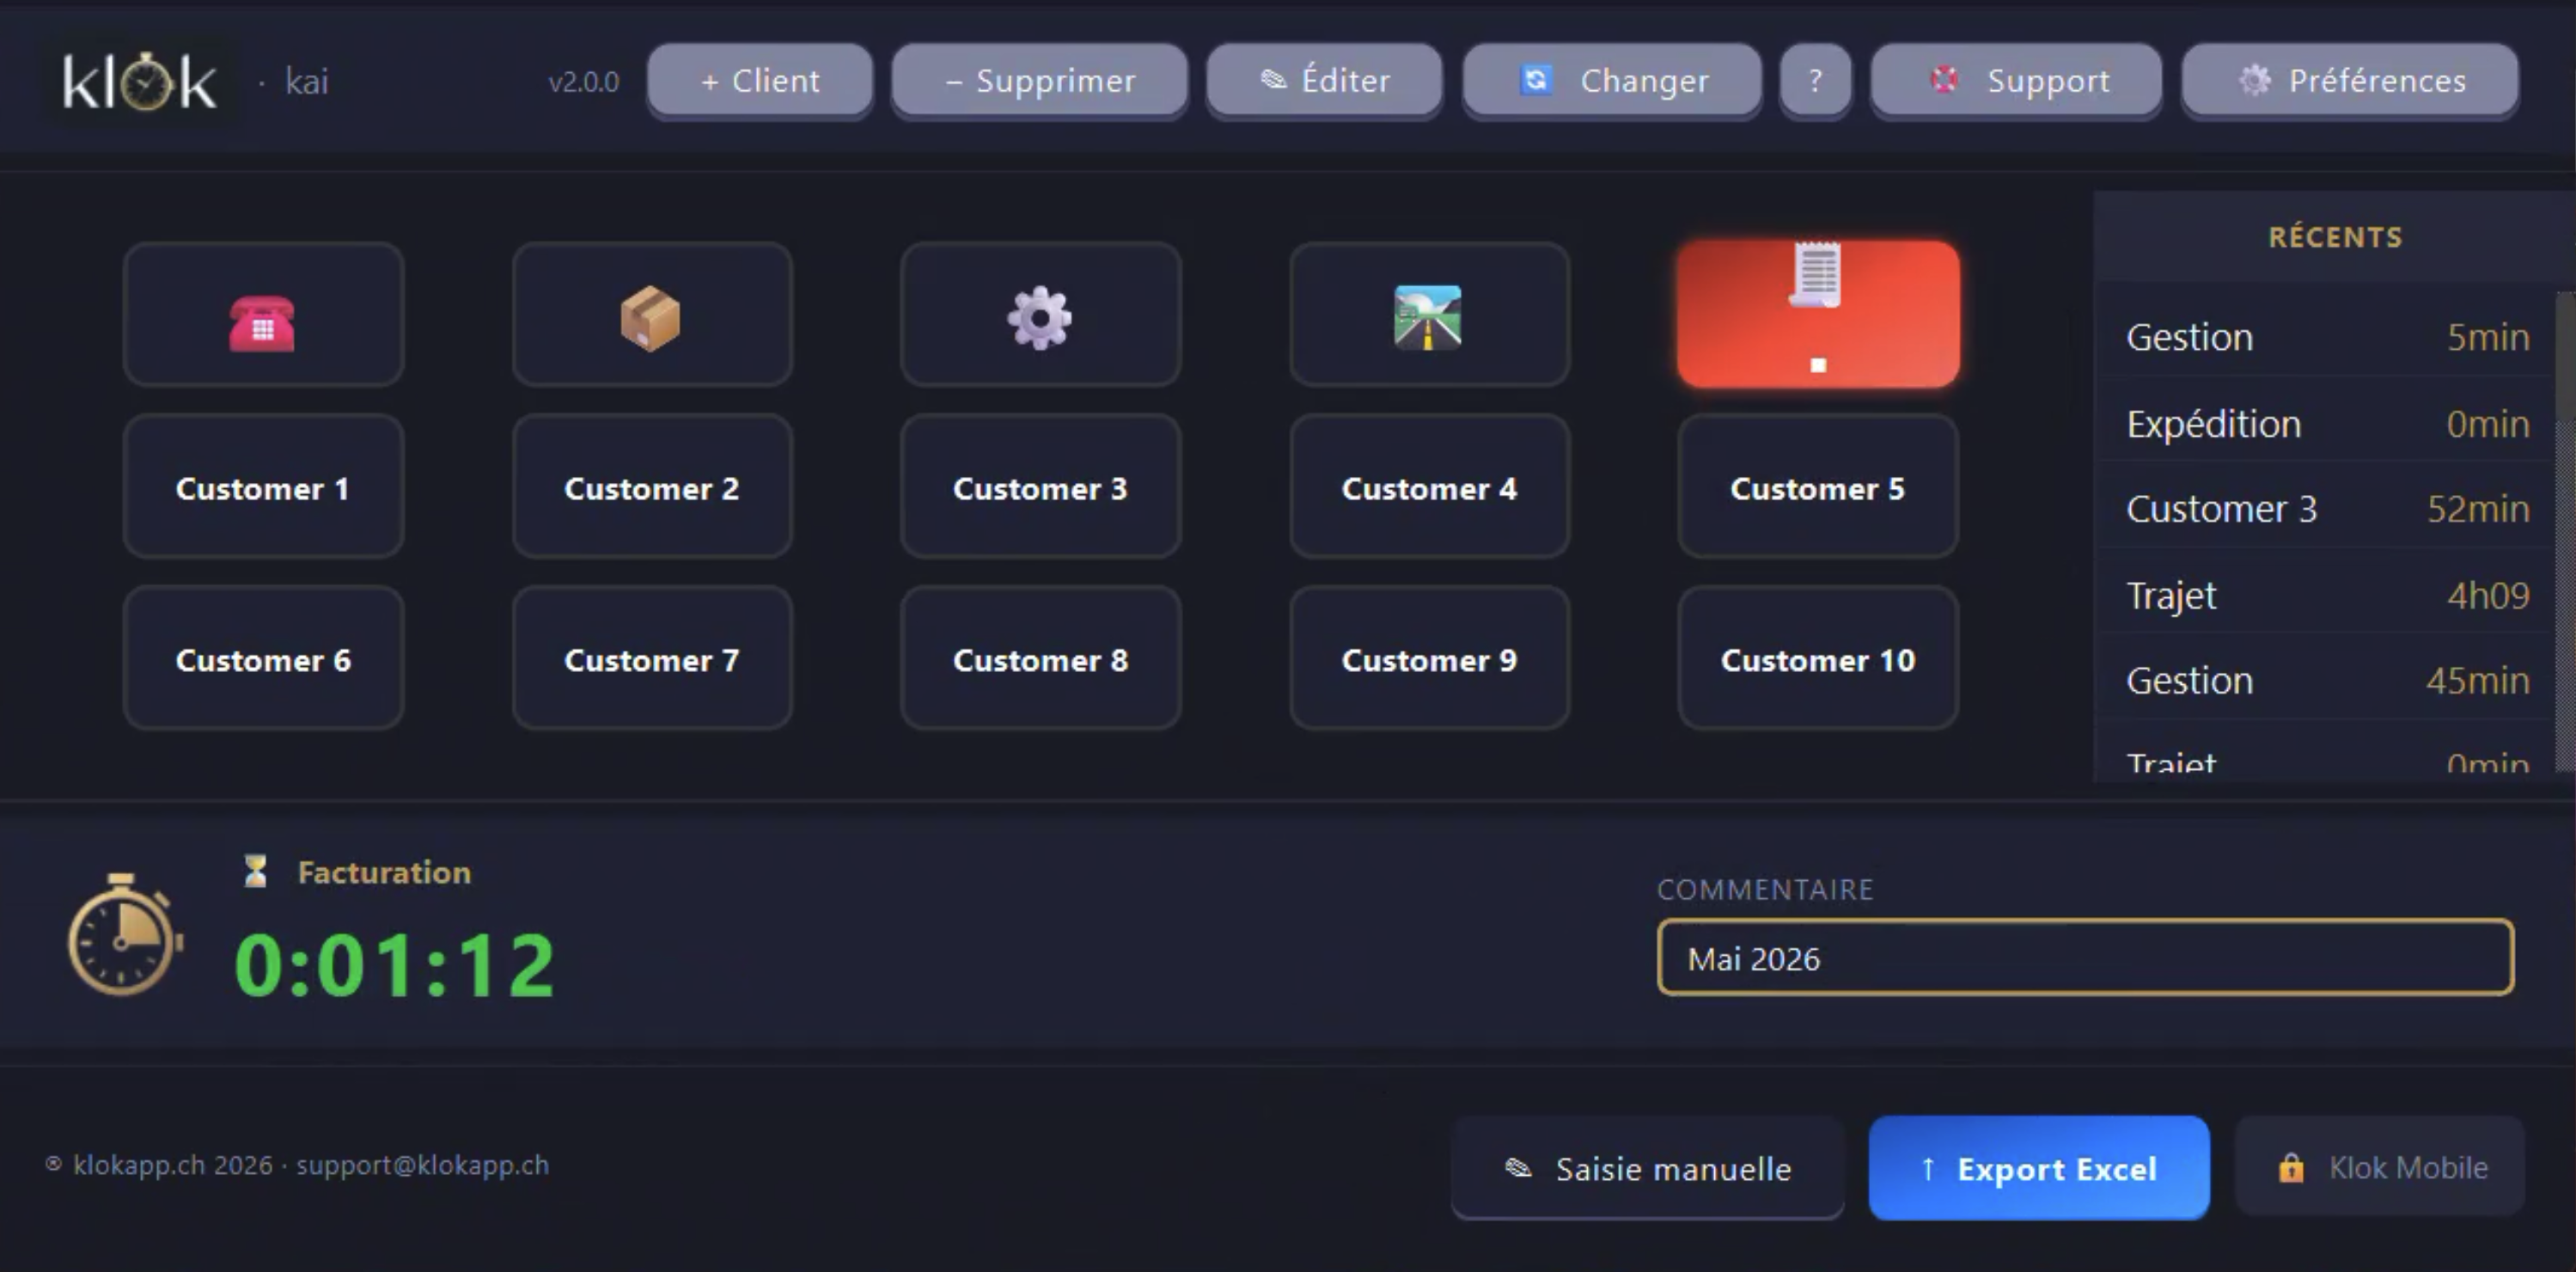
Cliquez sur le bouton du client dans la grille. Il passe en rouge et affiche ■ STOP. Le timer démarre immédiatement et s'affiche en bas à gauche.
Ajouter un commentaire
Pendant que le timer tourne, le champ COMMENTAIRE en bas à droite est actif. Décrivez la tâche en cours — cette information sera exportée dans Excel.
Arrêter un timer
Cliquez à nouveau sur le bouton rouge ■ STOP. L'entrée est automatiquement enregistrée avec :
- le client, la date, l'heure de début et de fin
- la durée calculée en minutes
- le commentaire saisi
La session apparaît immédiatement dans le Panneau Récents à droite.
Changer de client sans arrêter
Cliquez directement sur un autre client — le timer précédent s'arrête et s'enregistre automatiquement, puis le nouveau démarre.
Fermer avec un timer actif
Une boîte de dialogue vous propose : Oui (enregistre et quitte) · Non (quitte sans enregistrer) · Annuler (retour).
Zeiterfassung
Timer starten
Klicken Sie auf die Kundenschaltfläche. Sie wird rot und zeigt ■ STOP. Der Timer startet und wird unten links angezeigt.
Kommentar hinzufügen
Während der Timer läuft, ist das Feld KOMMENTAR unten rechts aktiv. Beschreiben Sie die Aufgabe — wird in Excel exportiert.
Timer stoppen
Klicken Sie erneut auf ■ STOP. Der Eintrag wird gespeichert mit Kunde, Datum, Start/Ende, Dauer und Kommentar. Die Sitzung erscheint sofort im Zuletzt-Panel.
Kunden wechseln ohne zu stoppen
Direkt auf einen anderen Kunden klicken — der vorherige Timer stoppt und speichert automatisch.
Schließen mit aktivem Timer
Ein Dialog bietet: Ja (speichern und beenden) · Nein (ohne Speichern) · Abbrechen (zurück).
Time tracking
Start a timer
Click the client button in the grid. It turns red and shows ■ STOP. The timer starts and is displayed at the bottom left.
Add a comment
While the timer is running, the COMMENT field at bottom right is active. Describe the task — it will be exported to Excel.
Stop a timer
Click the red ■ STOP button again. The entry is saved with client, date, start/end time, duration and comment. The session appears immediately in the Recent panel.
Switch client without stopping
Click directly on another client — the previous timer stops and saves automatically, then the new one starts.
Close with an active timer
A dialog offers: Yes (save and quit) · No (quit without saving) · Cancel (return).
Panneau Récents
Le panneau RÉCENTS occupe la droite de la grille. Il affiche les 20 dernières sessions enregistrées — client à gauche, durée en or à droite.
Il se met à jour automatiquement à chaque arrêt de timer. C'est un affichage en lecture seule : pour modifier une entrée, utilisez la Saisie manuelle ou Klok Editor.
Zuletzt-Panel
Das ZULETZT-Panel befindet sich rechts vom Raster. Es zeigt die letzten 20 gespeicherten Sitzungen — Kunde links, Dauer in Gold rechts.
Es aktualisiert sich automatisch bei jedem Timer-Stopp. Es ist schreibgeschützt: Zum Ändern eines Eintrags verwenden Sie die manuelle Eingabe oder den Klok Editor.
Recent panel
The RECENT panel sits to the right of the grid. It displays the last 20 recorded sessions — client name on the left, duration in gold on the right.
It updates automatically each time a timer is stopped. It is read-only: to edit an entry, use Manual entry or Klok Editor.
Saisie manuelle
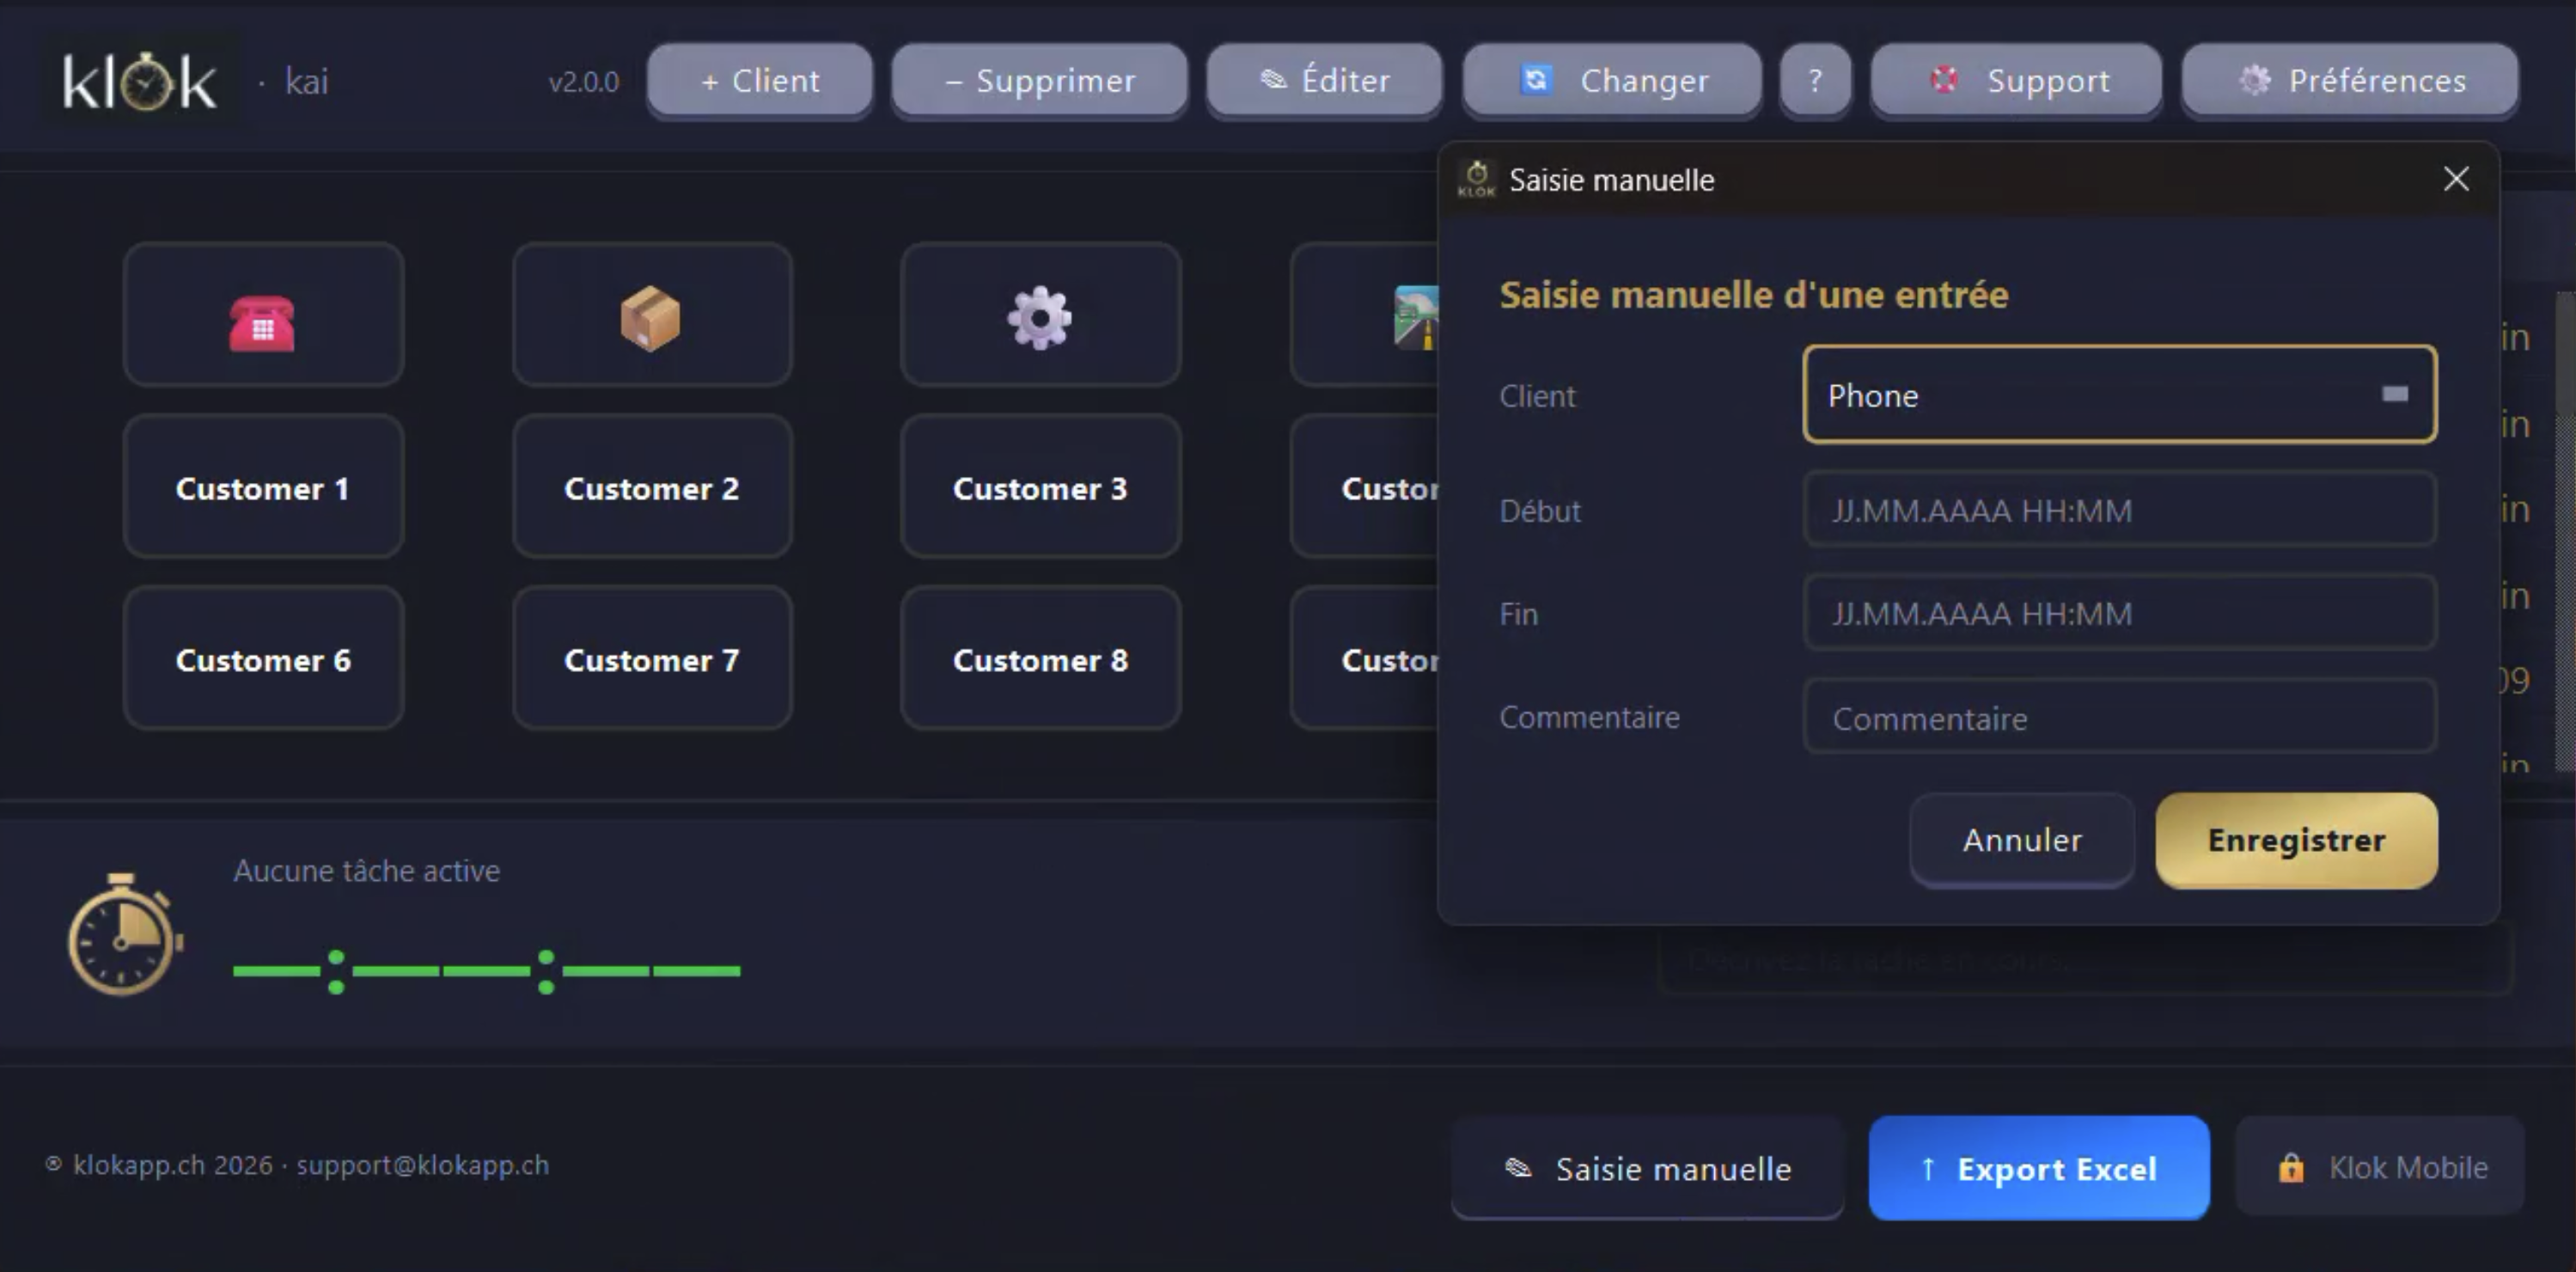
Cliquez sur ✎ Saisie manuelle pour ajouter une entrée après coup — une réunion oubliée, un trajet, du travail hors bureau.
- Sélectionnez le client dans la liste déroulante.
- Saisissez la date et l'heure de début au format
JJ.MM.AAAA HH:MM. - Saisissez la date et l'heure de fin.
- Ajoutez un commentaire (optionnel).
- Cliquez Enregistrer. La durée est calculée automatiquement.
17.05.2026 09:30
Manuelle Eingabe
Klicken Sie auf ✎ Manuelle Eingabe, um einen Eintrag nachträglich hinzuzufügen.
- Wählen Sie den Kunden aus der Dropdown-Liste.
- Geben Sie Start im Format
TT.MM.JJJJ HH:MMein. - Geben Sie das Ende ein.
- Kommentar hinzufügen (optional).
- Klicken Sie Speichern. Die Dauer wird automatisch berechnet.
17.05.2026 09:30
Manual entry
Click ✎ Manual entry to add an entry after the fact — a forgotten meeting, a trip, off-site work.
- Select the client from the dropdown list.
- Enter start date and time in format
DD.MM.YYYY HH:MM. - Enter end date and time.
- Add a comment (optional).
- Click Save. Duration is calculated automatically.
17.05.2026 09:30
Export Excel & CSV
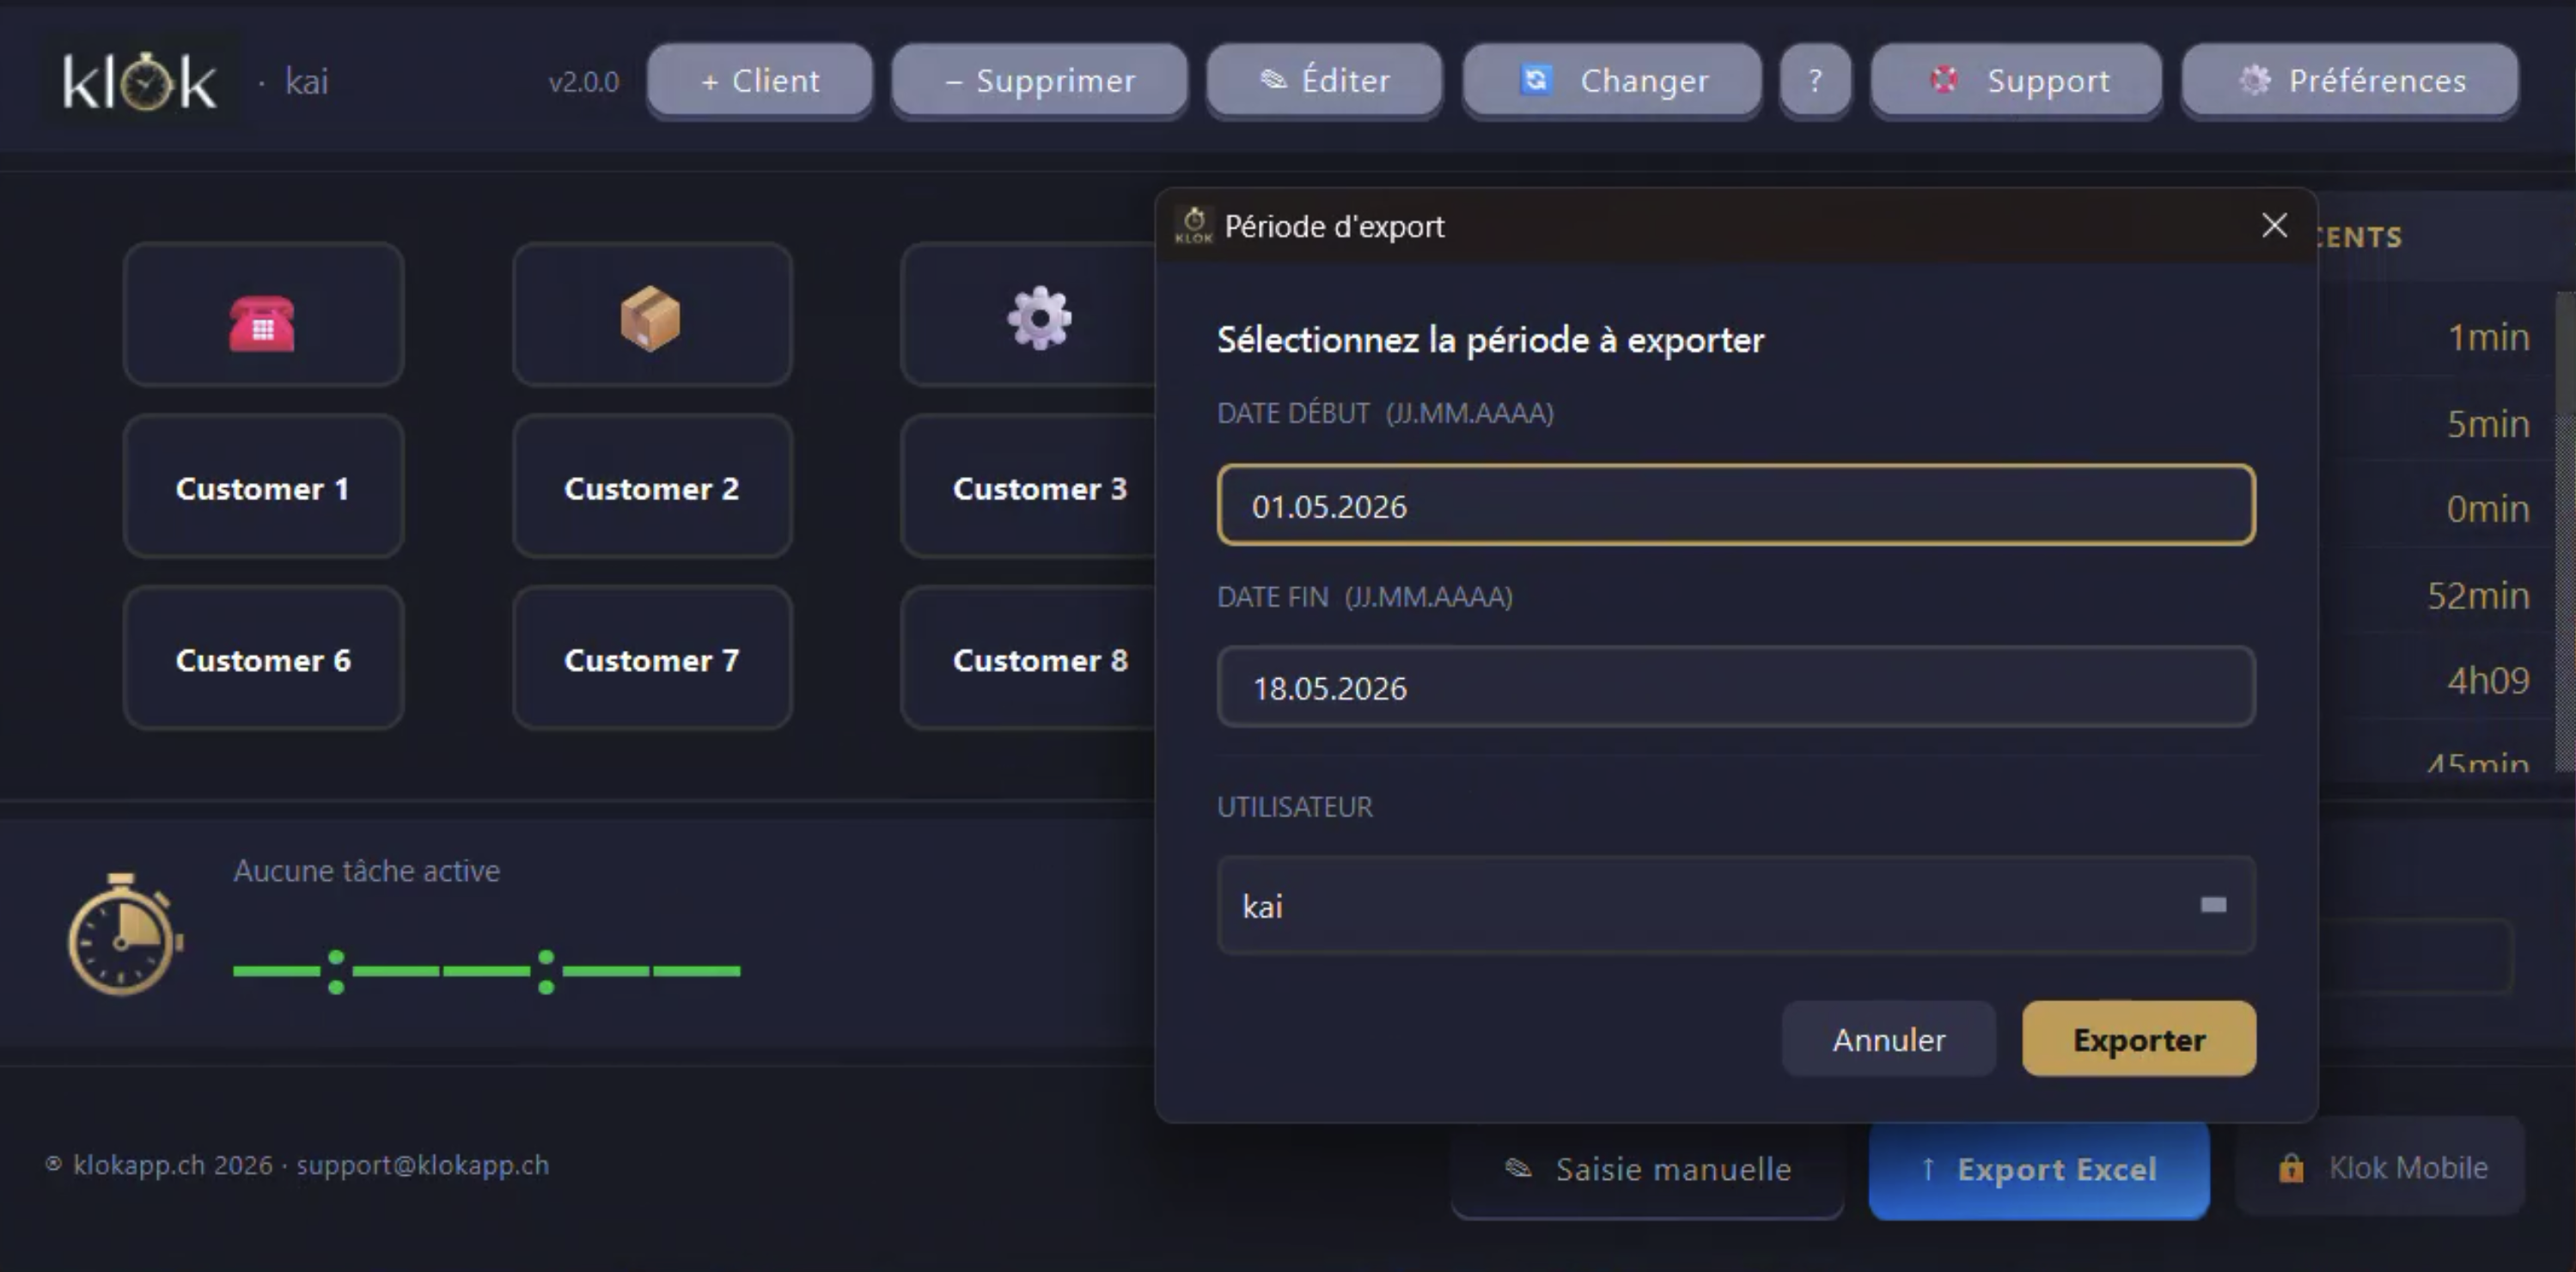
Cliquez sur ↑ Export Excel pour exporter vos saisies.
- Choisissez la période (date de début / date de fin).
- (Klok Team) Choisissez un utilisateur ou exportez tous les utilisateurs.
- Choisissez l'emplacement et le nom du fichier.
- Le fichier s'ouvre automatiquement dans Excel.
Contenu du fichier XLSX
- Feuille Synthèse — total des heures par client (H:MM:SS) et total général.
- Feuille Détail — toutes les entrées : client, début, fin, durée, commentaire.
- Feuille par utilisateur — synthèse individuelle (Klok Team).
Export CSV — Crésus, Sage, Winbiz
Via Klok Editor (outil manager), vous pouvez exporter un fichier CSV directement importable dans les logiciels de comptabilité suisses :
- Crésus — format compatible import prestations
- Sage — format texte délimité
- Winbiz — format CSV standard
Excel- & CSV-Export
Klicken Sie auf ↑ Excel Export.
- Zeitraum wählen (Start- und Enddatum).
- (Klok Team) Benutzer wählen oder alle exportieren.
- Speicherort und Dateinamen wählen.
- Datei öffnet sich automatisch in Excel.
XLSX-Inhalt
- Übersicht — Gesamtstunden pro Kunde (H:MM:SS) und Gesamtsumme.
- Detail — alle Einträge: Kunde, Start, Ende, Dauer, Kommentar.
- Pro Benutzer — individuelle Übersicht (Klok Team).
CSV-Export — Crésus, Sage, Winbiz
Über den Klok Editor können Sie eine CSV-Datei exportieren, die direkt in Schweizer Buchhaltungssoftware importiert werden kann.
Excel & CSV export
Click ↑ Export Excel to export your entries.
- Choose the period (start date / end date).
- (Klok Team) Choose a user or export all users.
- Choose the file location and name.
- The file opens automatically in Excel.
XLSX file contents
- Summary sheet — total hours per client (H:MM:SS) and grand total.
- Detail sheet — all entries: client, start, end, duration, comment.
- Per-user sheet — individual summary (Klok Team).
CSV export — Crésus, Sage, Winbiz
Via Klok Editor (manager tool), you can export a CSV file directly importable into Swiss accounting software:
- Crésus — compatible import format
- Sage — delimited text format
- Winbiz — standard CSV format
Mises à jour
Klok vérifie automatiquement les mises à jour au démarrage. Cette vérification est silencieuse : elle se fait en arrière-plan, sans fenêtre ni interruption, et ne transmet aucune donnée personnelle.
Si une nouvelle version est disponible, une barre dorée s'affiche en haut de l'interface avec le numéro de version et un bouton Télécharger. Ce bouton ouvre simplement votre navigateur sur la page de téléchargement de klokapp.ch.
Les mises à jour sont distribuées sous forme d'exécutables sur klokapp.ch. Aucune mise à jour automatique en arrière-plan : vous gardez le contrôle total.
Updates
Klok prüft beim Start automatisch auf Updates. Diese Prüfung ist still: Sie läuft im Hintergrund, ohne Fenster oder Unterbrechung, und überträgt keine persönlichen Daten.
Ist eine neue Version verfügbar, erscheint eine goldene Leiste mit Versionsnummer und Herunterladen-Button, der Ihren Browser auf die klokapp.ch-Downloadseite öffnet.
Updates werden als ausführbare Dateien auf klokapp.ch verteilt. Kein automatisches Hintergrund-Update: Sie behalten die volle Kontrolle.
Updates
Klok automatically checks for updates at startup. This check is silent: it runs in the background with no window or interruption, and transmits no personal data.
If a new version is available, a gold bar appears at the top of the interface with the version number and a Download button that opens your browser to the klokapp.ch download page.
Updates are distributed as executables on klokapp.ch. No automatic background updates: you retain full control.
Support & SOS
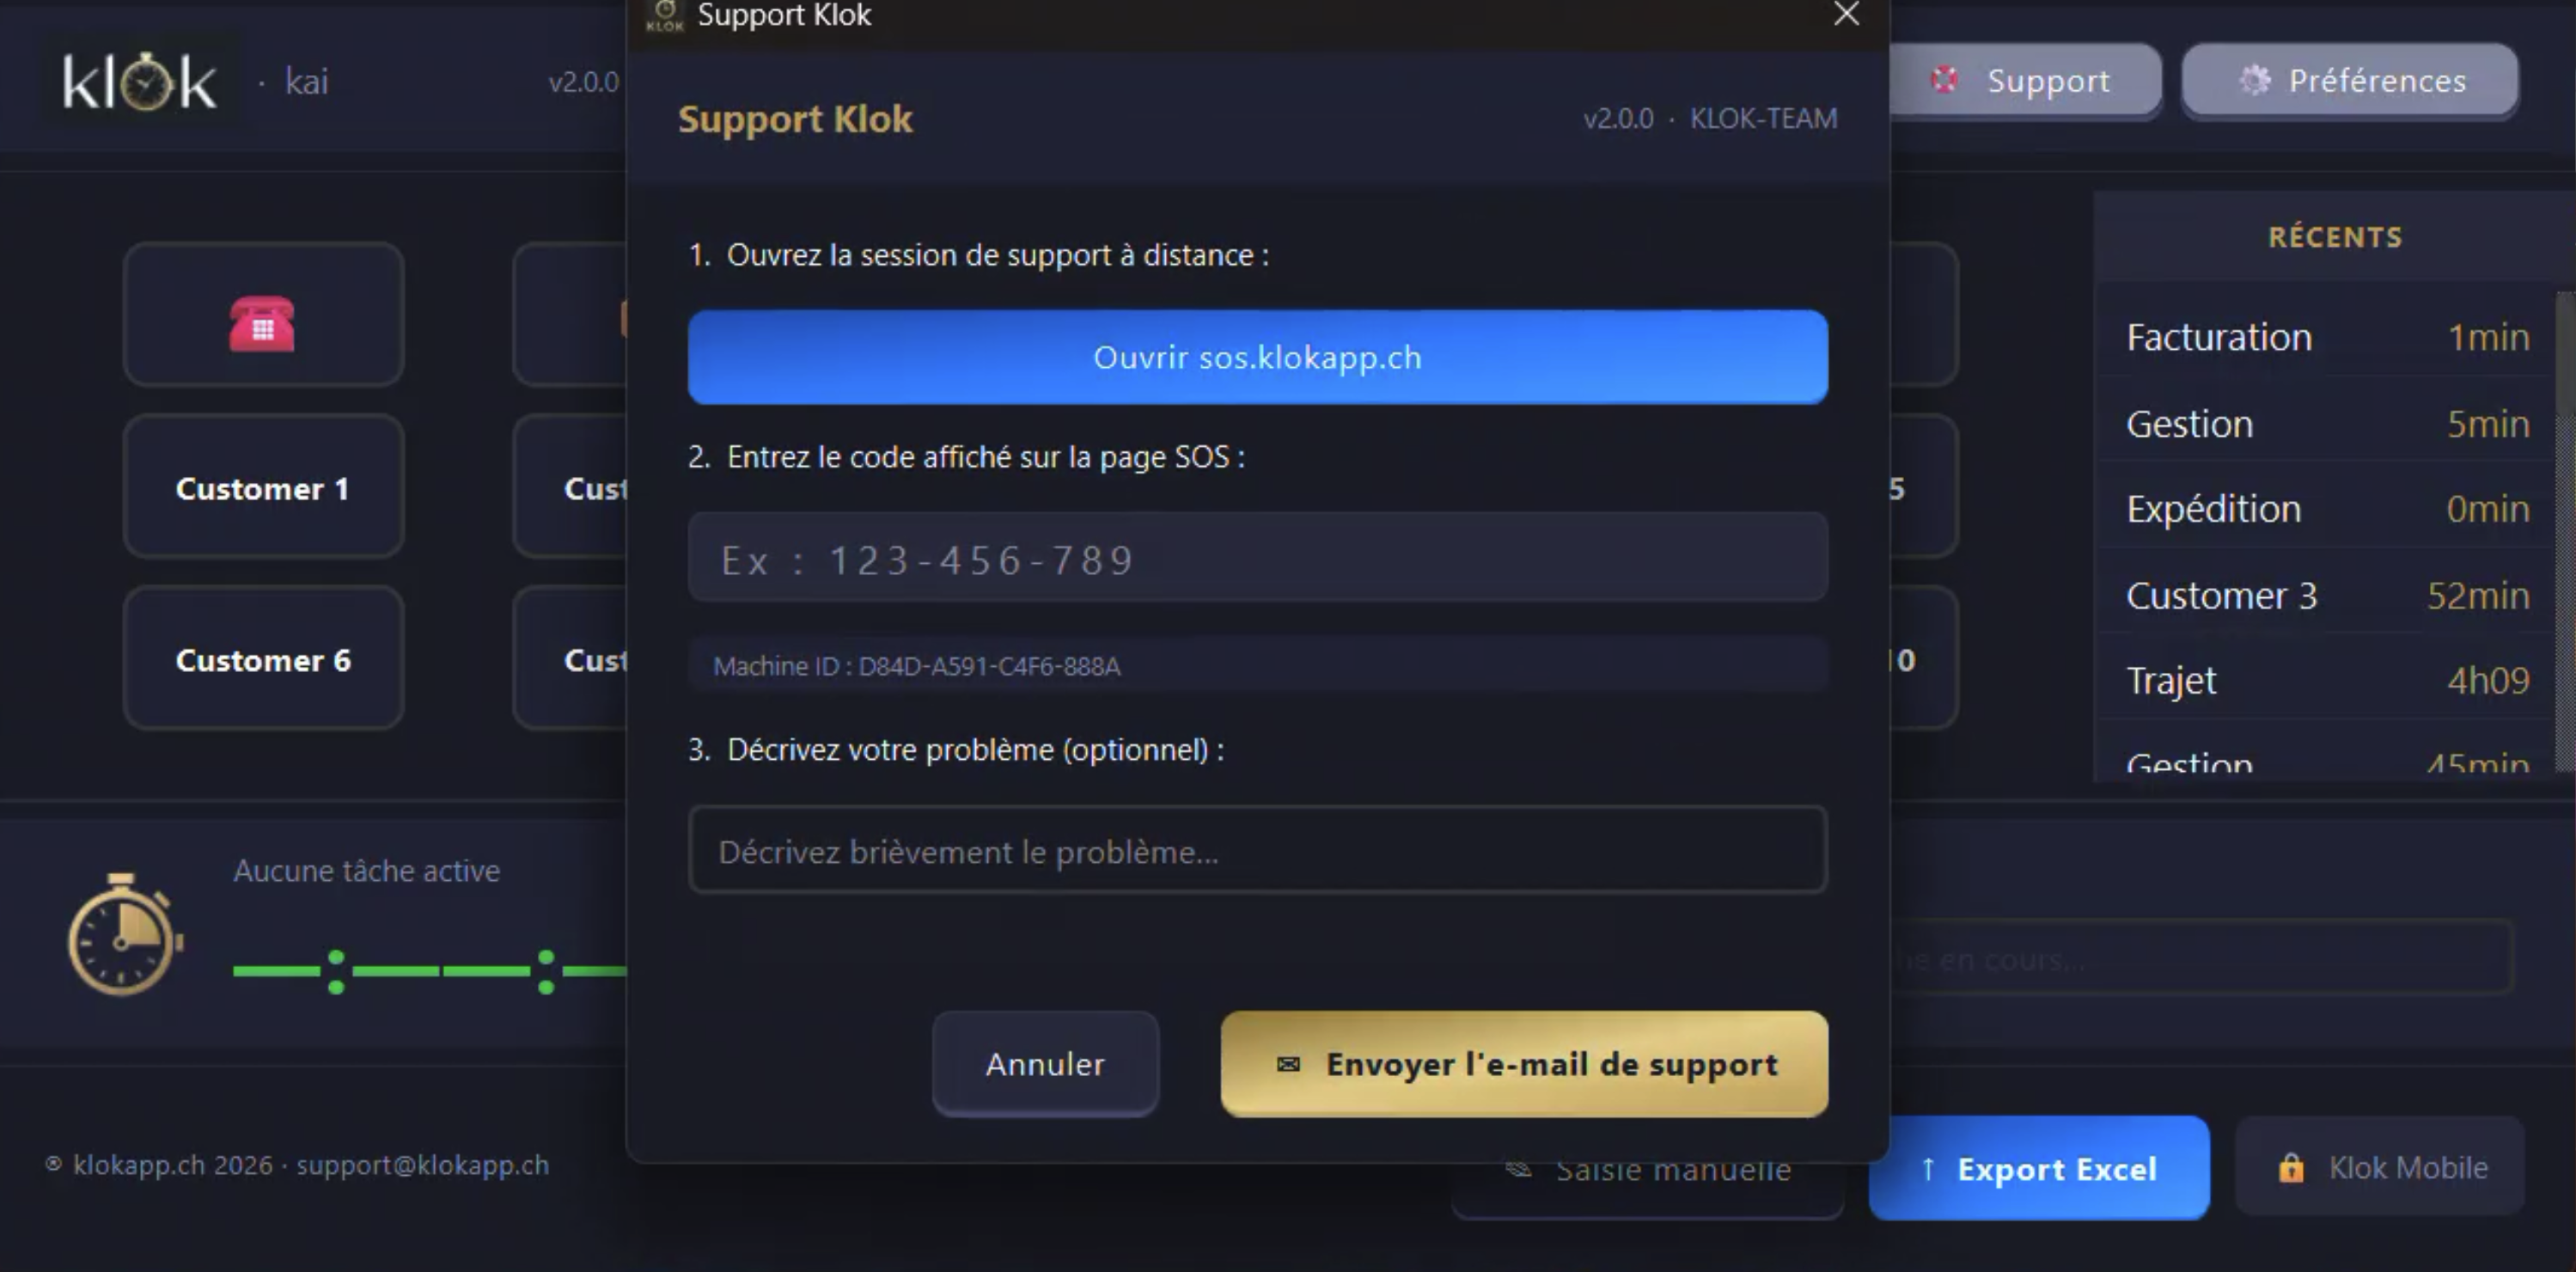
Cliquez sur 🛟 Support dans l'en-tête pour accéder aux options d'assistance.
Télémaintenance SOS
Si vous avez besoin d'une assistance immédiate, cliquez SOS Télémaintenance — votre navigateur ouvre sos.klokapp.ch où vous pouvez lancer une session Splashtop pour permettre à votre technicien Klok de prendre la main à distance.
Email de support
Pour toute question, envoyez un message à support@klokapp.ch.
Pour les demandes de licence : license@klokapp.ch
Support & SOS
Klicken Sie auf 🛟 Support in der Kopfzeile.
SOS-Fernwartung
Für sofortige Hilfe klicken Sie SOS Fernwartung — Ihr Browser öffnet sos.klokapp.ch für eine Splashtop-Sitzung mit Ihrem Klok-Techniker.
Support per E-Mail
Fragen: support@klokapp.ch
Lizenzanfragen: license@klokapp.ch
Support & SOS
Click 🛟 Support in the header to access assistance options.
SOS remote assistance
For immediate help, click SOS Remote assistance — your browser opens sos.klokapp.ch where you can start a Splashtop session to allow your Klok technician to take control remotely.
Email support
General questions: support@klokapp.ch
Licence requests: license@klokapp.ch
Préférences
Cliquez sur ⚙ Préférences pour accéder aux réglages.
Langue
Klok est disponible en français, allemand et anglais. Cliquez sur la langue souhaitée et sauvegardez. Le choix est mémorisé et appliqué au prochain démarrage.
Informations de licence
- Type de licence activée (Klok Standard ou Klok Team)
- Identifiant machine — utile pour demander une nouvelle clé
Einstellungen
Klicken Sie auf ⚙ Einstellungen.
Sprache
Klok ist auf Französisch, Deutsch und Englisch verfügbar. Auswahl wird gespeichert und beim nächsten Start angewendet.
Lizenzinformationen
- Typ der aktivierten Lizenz (Klok Standard oder Klok Team)
- Geräte-ID — für neue Schlüsselanfragen
Preferences
Click ⚙ Preferences to access the settings.
Language
Klok is available in French, German and English. The choice is remembered and applied on next launch.
Licence information
- Type of activated licence (Klok Standard or Klok Team)
- Machine ID — useful when requesting a new key
Gestion des utilisateurs — Klok Team
Ajouter un utilisateur
- Au démarrage, dans la fenêtre de sélection, cliquez + Ajouter.
- Saisissez le prénom et nom complet.
- L'utilisateur est ajouté et sélectionné automatiquement.
Supprimer un utilisateur
- Sélectionnez l'utilisateur dans la liste.
- Cliquez − Supprimer.
Changer d'utilisateur en cours de session
Cliquez sur 🔄 Changer dans l'en-tête. Si un timer est actif, il vous sera proposé de l'enregistrer d'abord. Choisissez le nouvel utilisateur et cliquez → Démarrer.
Export par utilisateur
Lors de l'export Excel, un filtre permet de choisir un utilisateur spécifique ou d'exporter toutes les saisies de tous les utilisateurs.
Benutzerverwaltung — Klok Team
Benutzer hinzufügen
- Beim Start im Auswahlfenster auf + Hinzufügen klicken.
- Vor- und Nachnamen eingeben.
- Benutzer wird hinzugefügt und automatisch ausgewählt.
Benutzer entfernen
- Benutzer in der Liste auswählen.
- Auf − Entfernen klicken.
Benutzer wechseln
In der Kopfzeile 🔄 Wechseln klicken. Bei aktivem Timer wird angeboten, diesen zu speichern. Neuen Benutzer wählen und → Starten klicken.
Export nach Benutzer
Beim Excel-Export ermöglicht ein Filter die Auswahl eines bestimmten Benutzers oder aller Benutzer.
User management — Klok Team
Add a user
- At startup, in the selection window, click + Add.
- Enter first and last name.
- The user is added and automatically selected.
Remove a user
- Select the user in the list.
- Click − Remove.
Switch user during a session
Click 🔄 Switch in the header. If a timer is active, you will be offered to save it first. Choose the new user and click → Start.
Export by user
During Excel export, a filter lets you choose a specific user or export all users' entries.
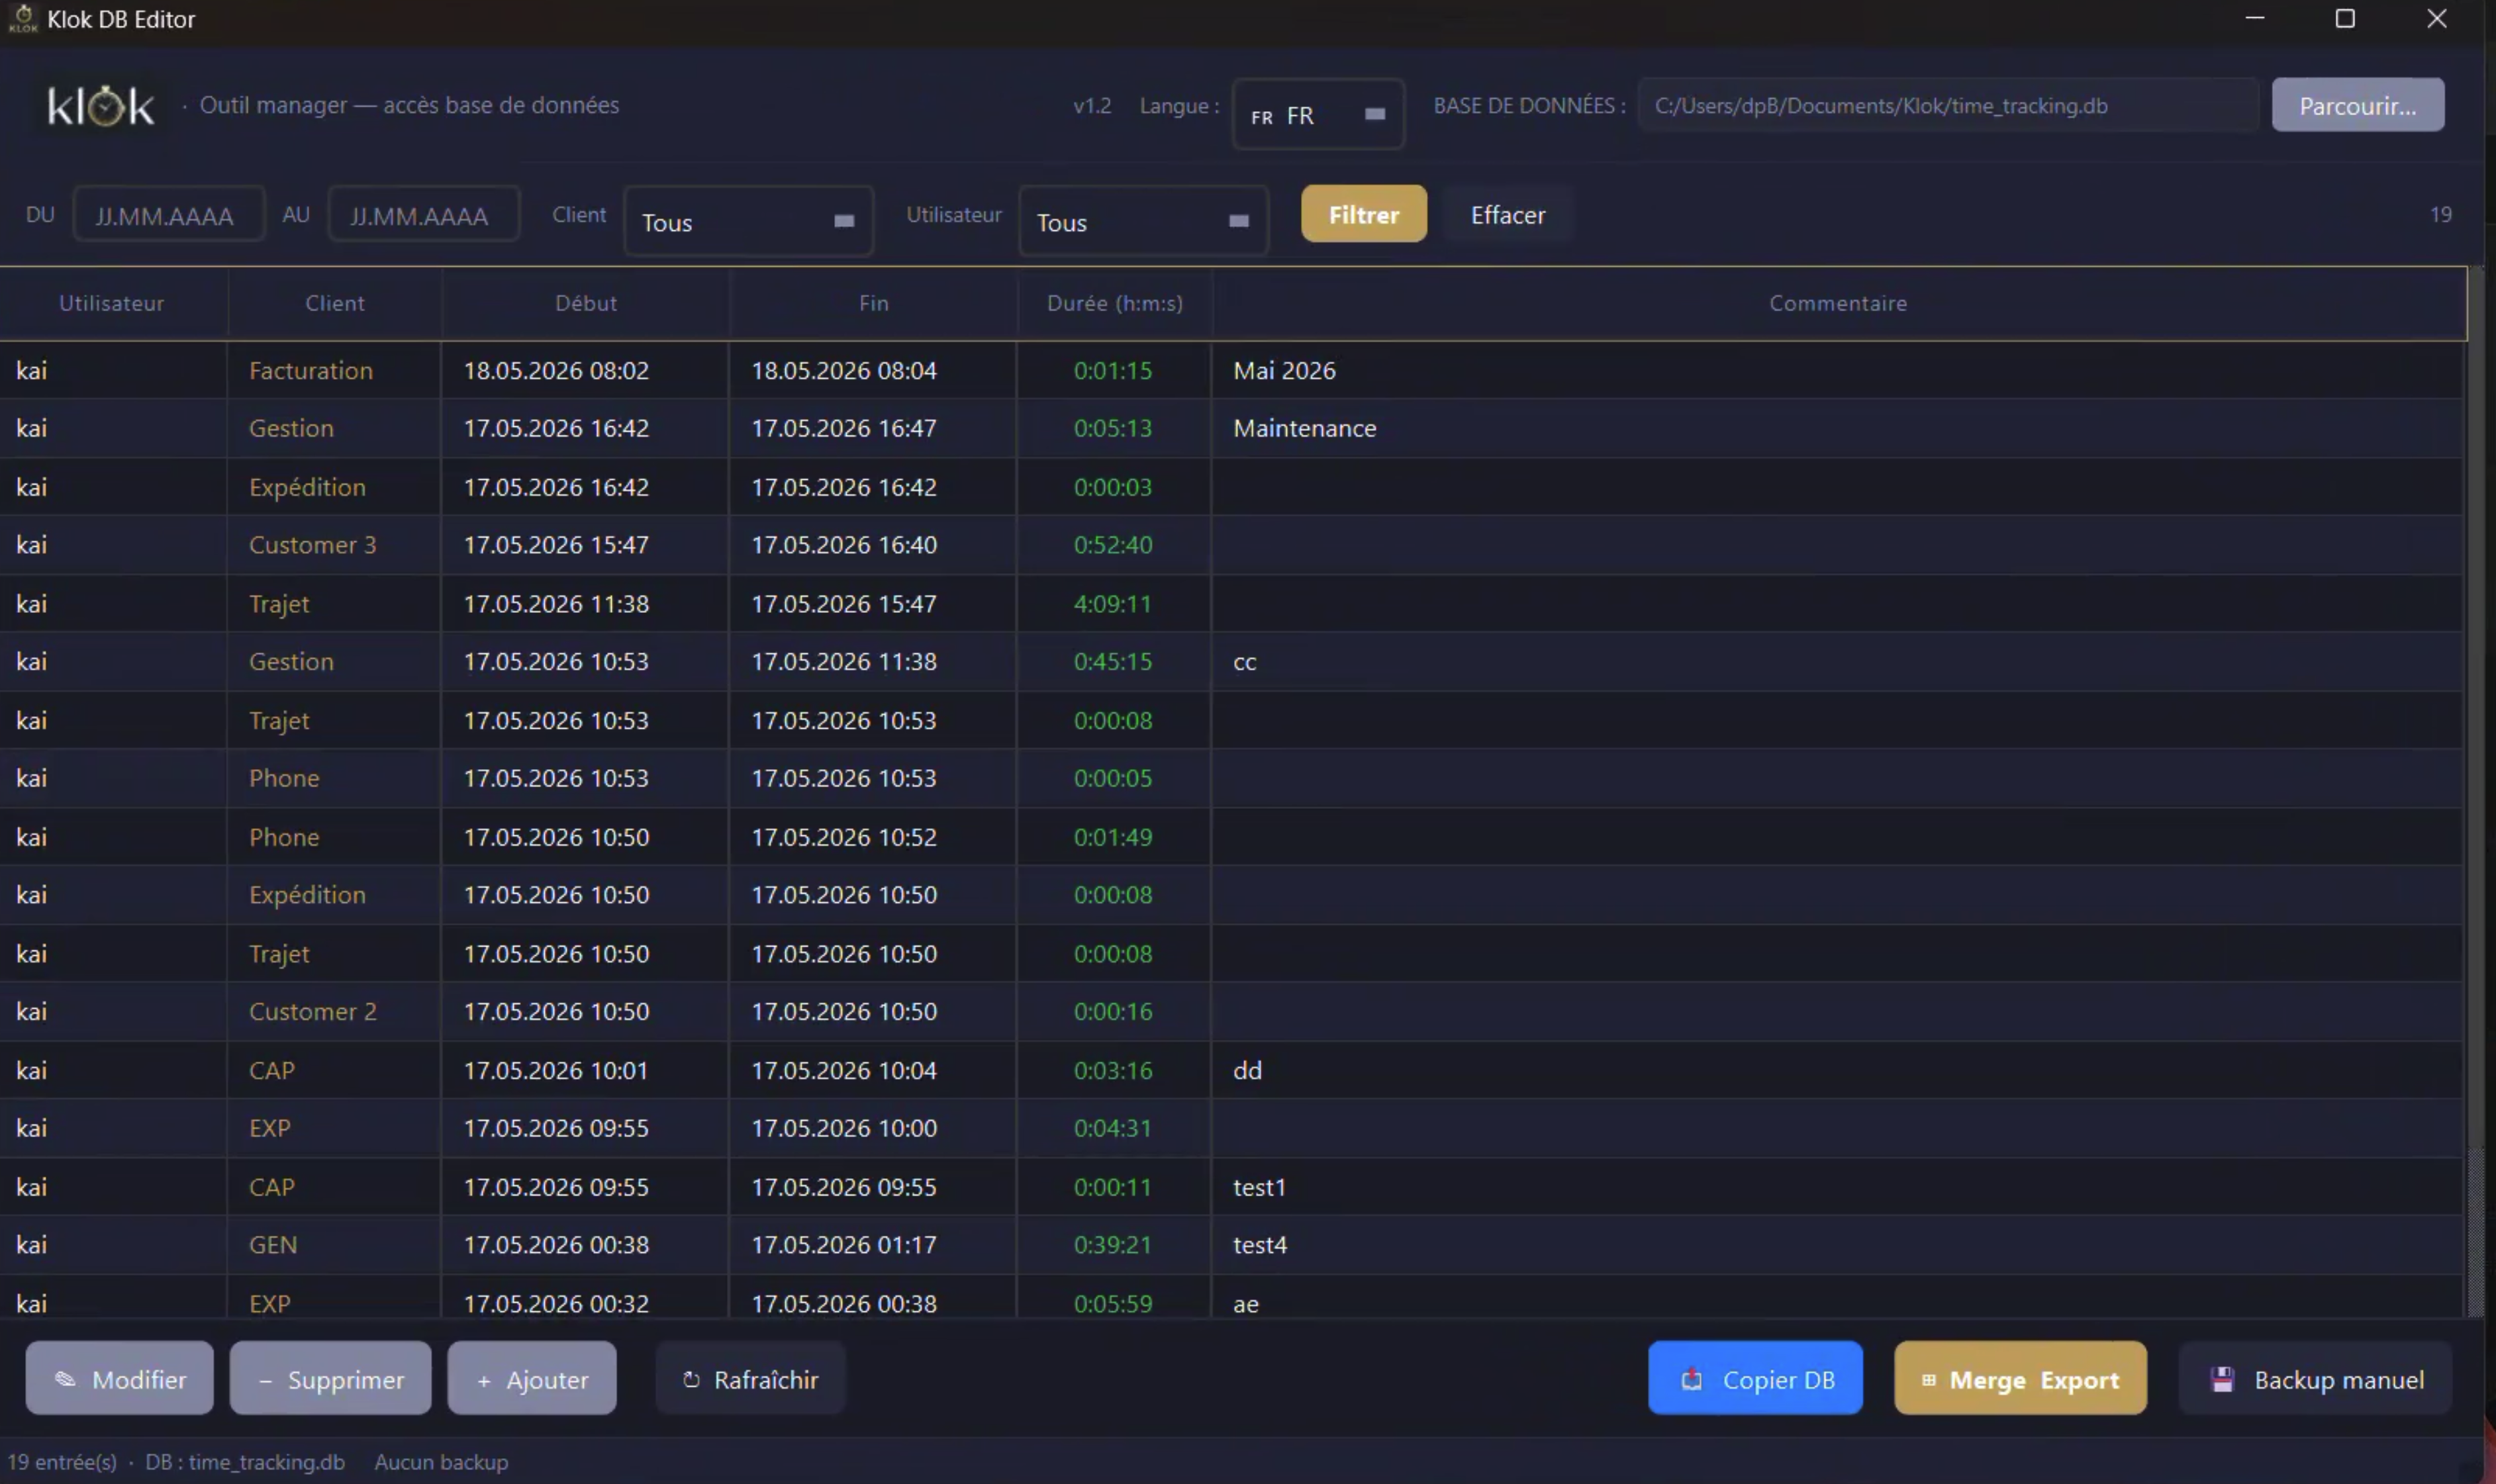
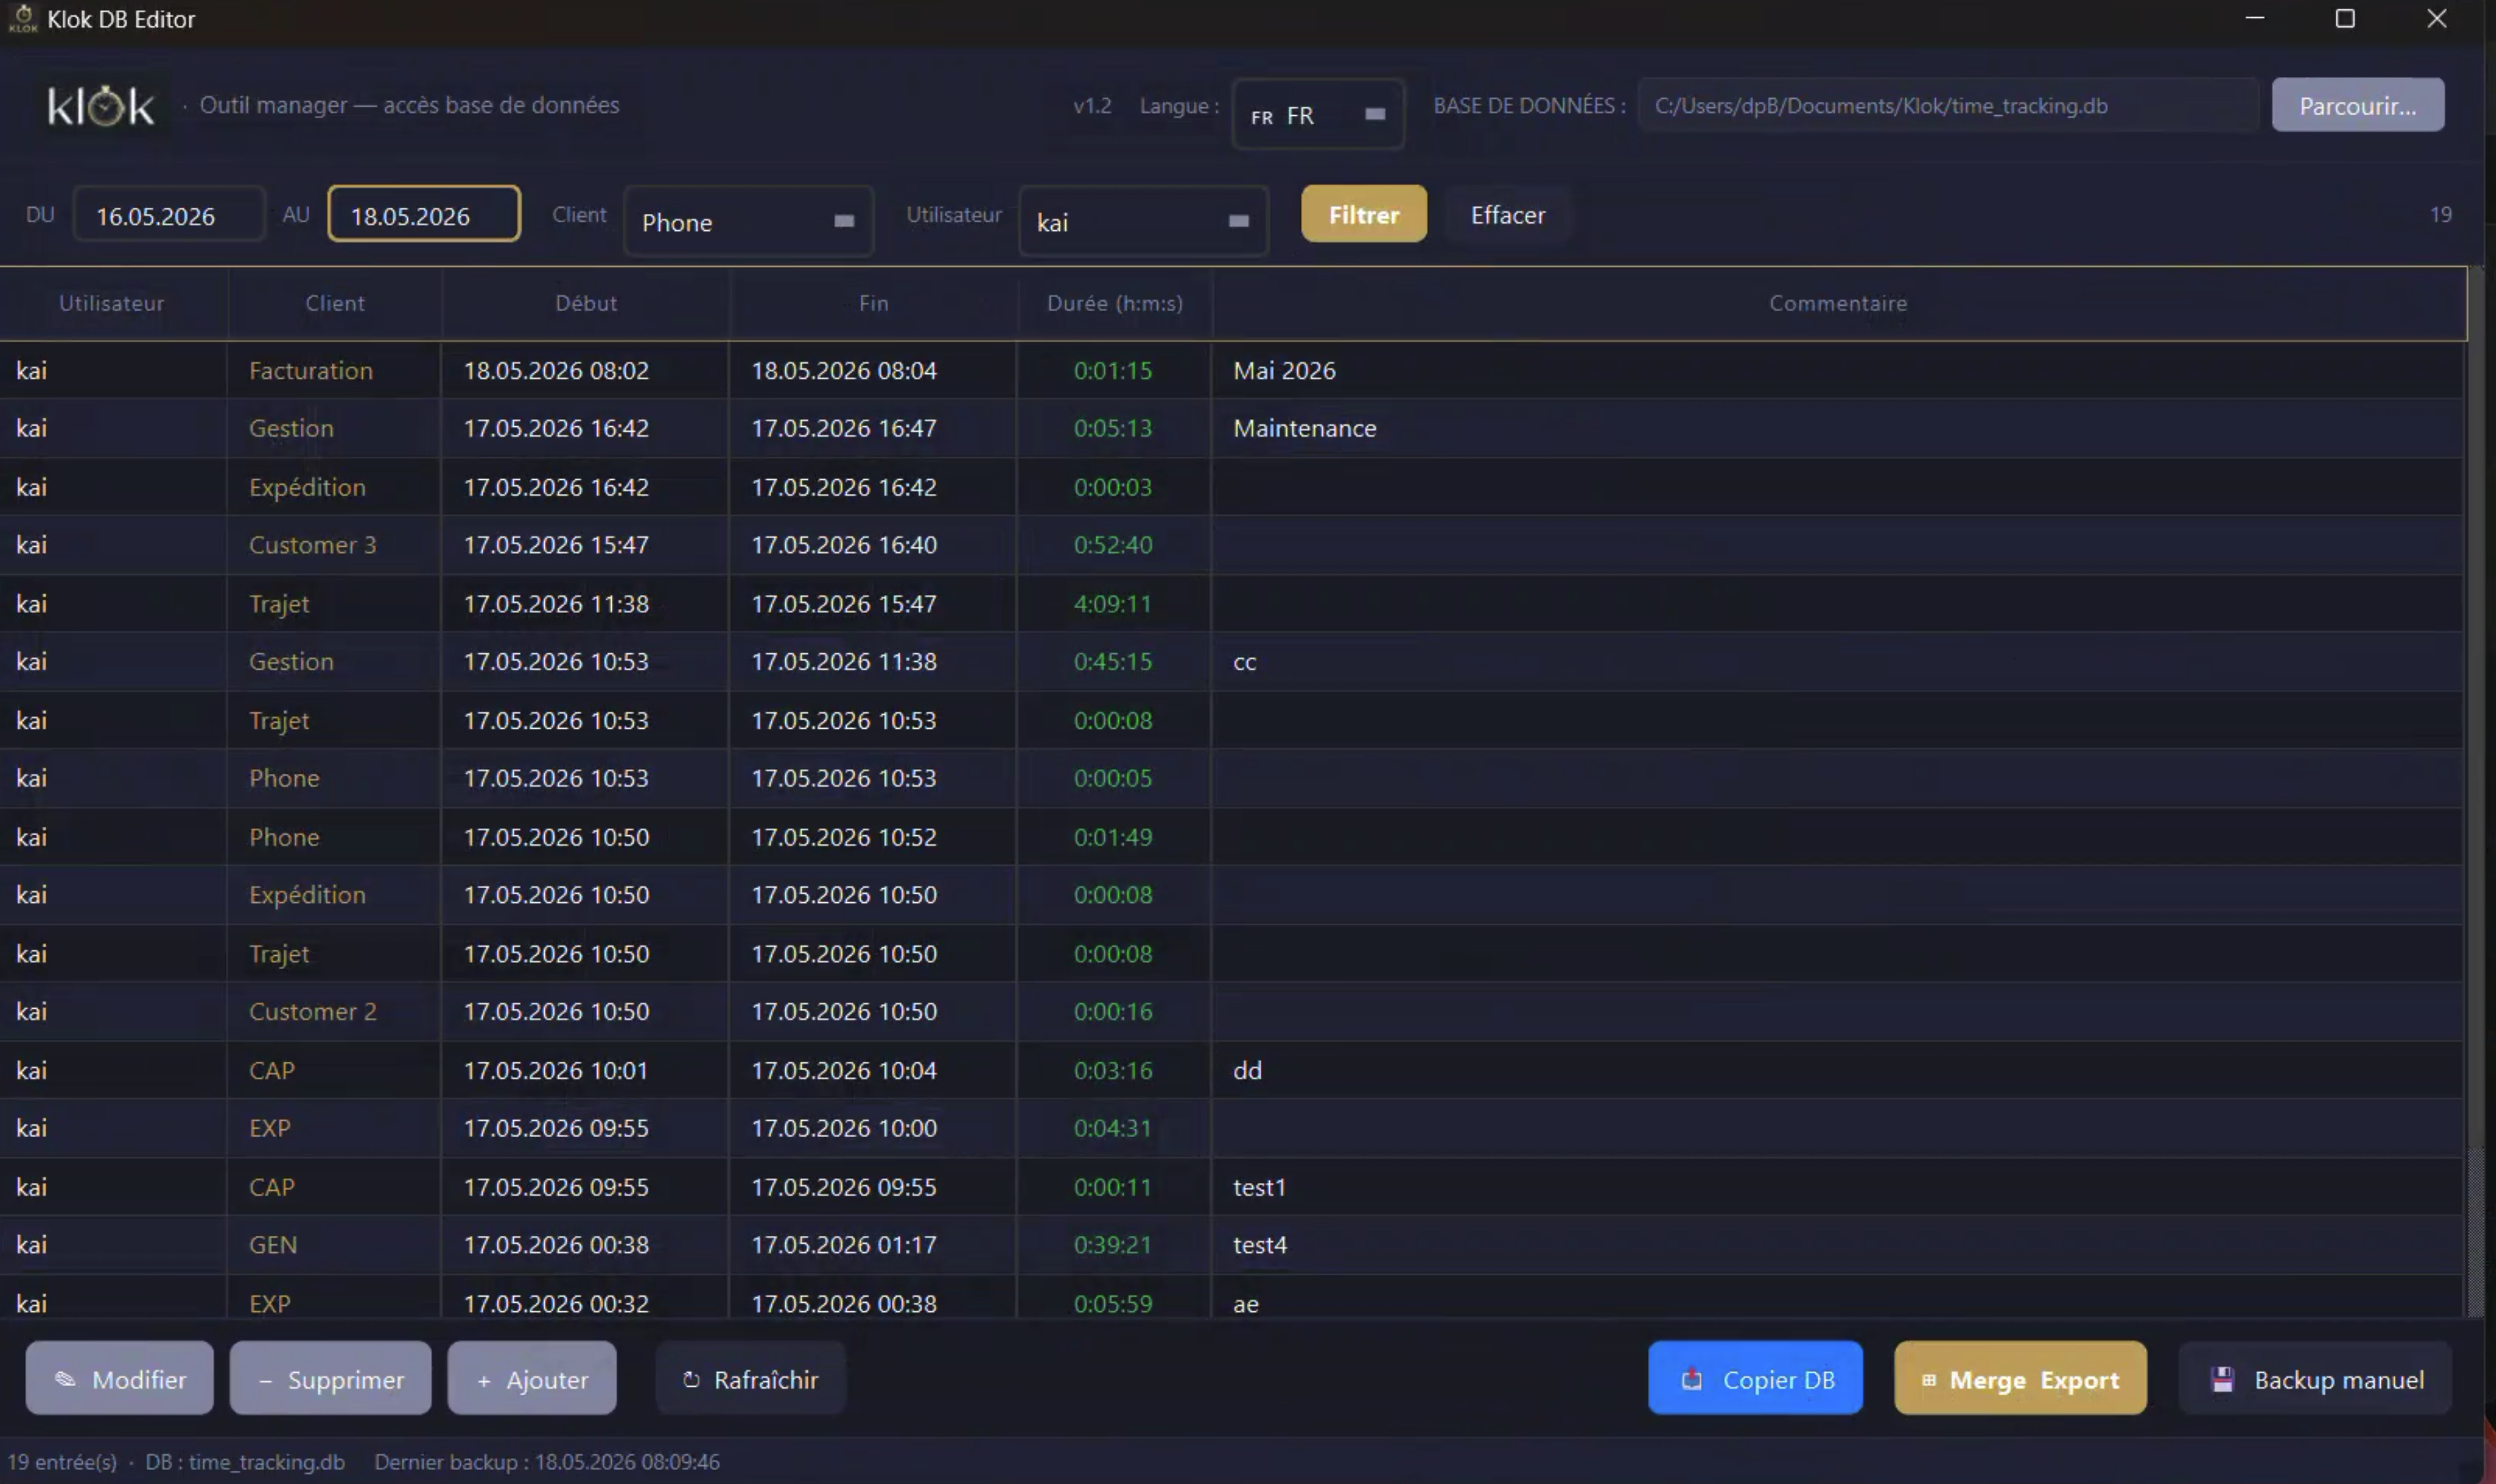
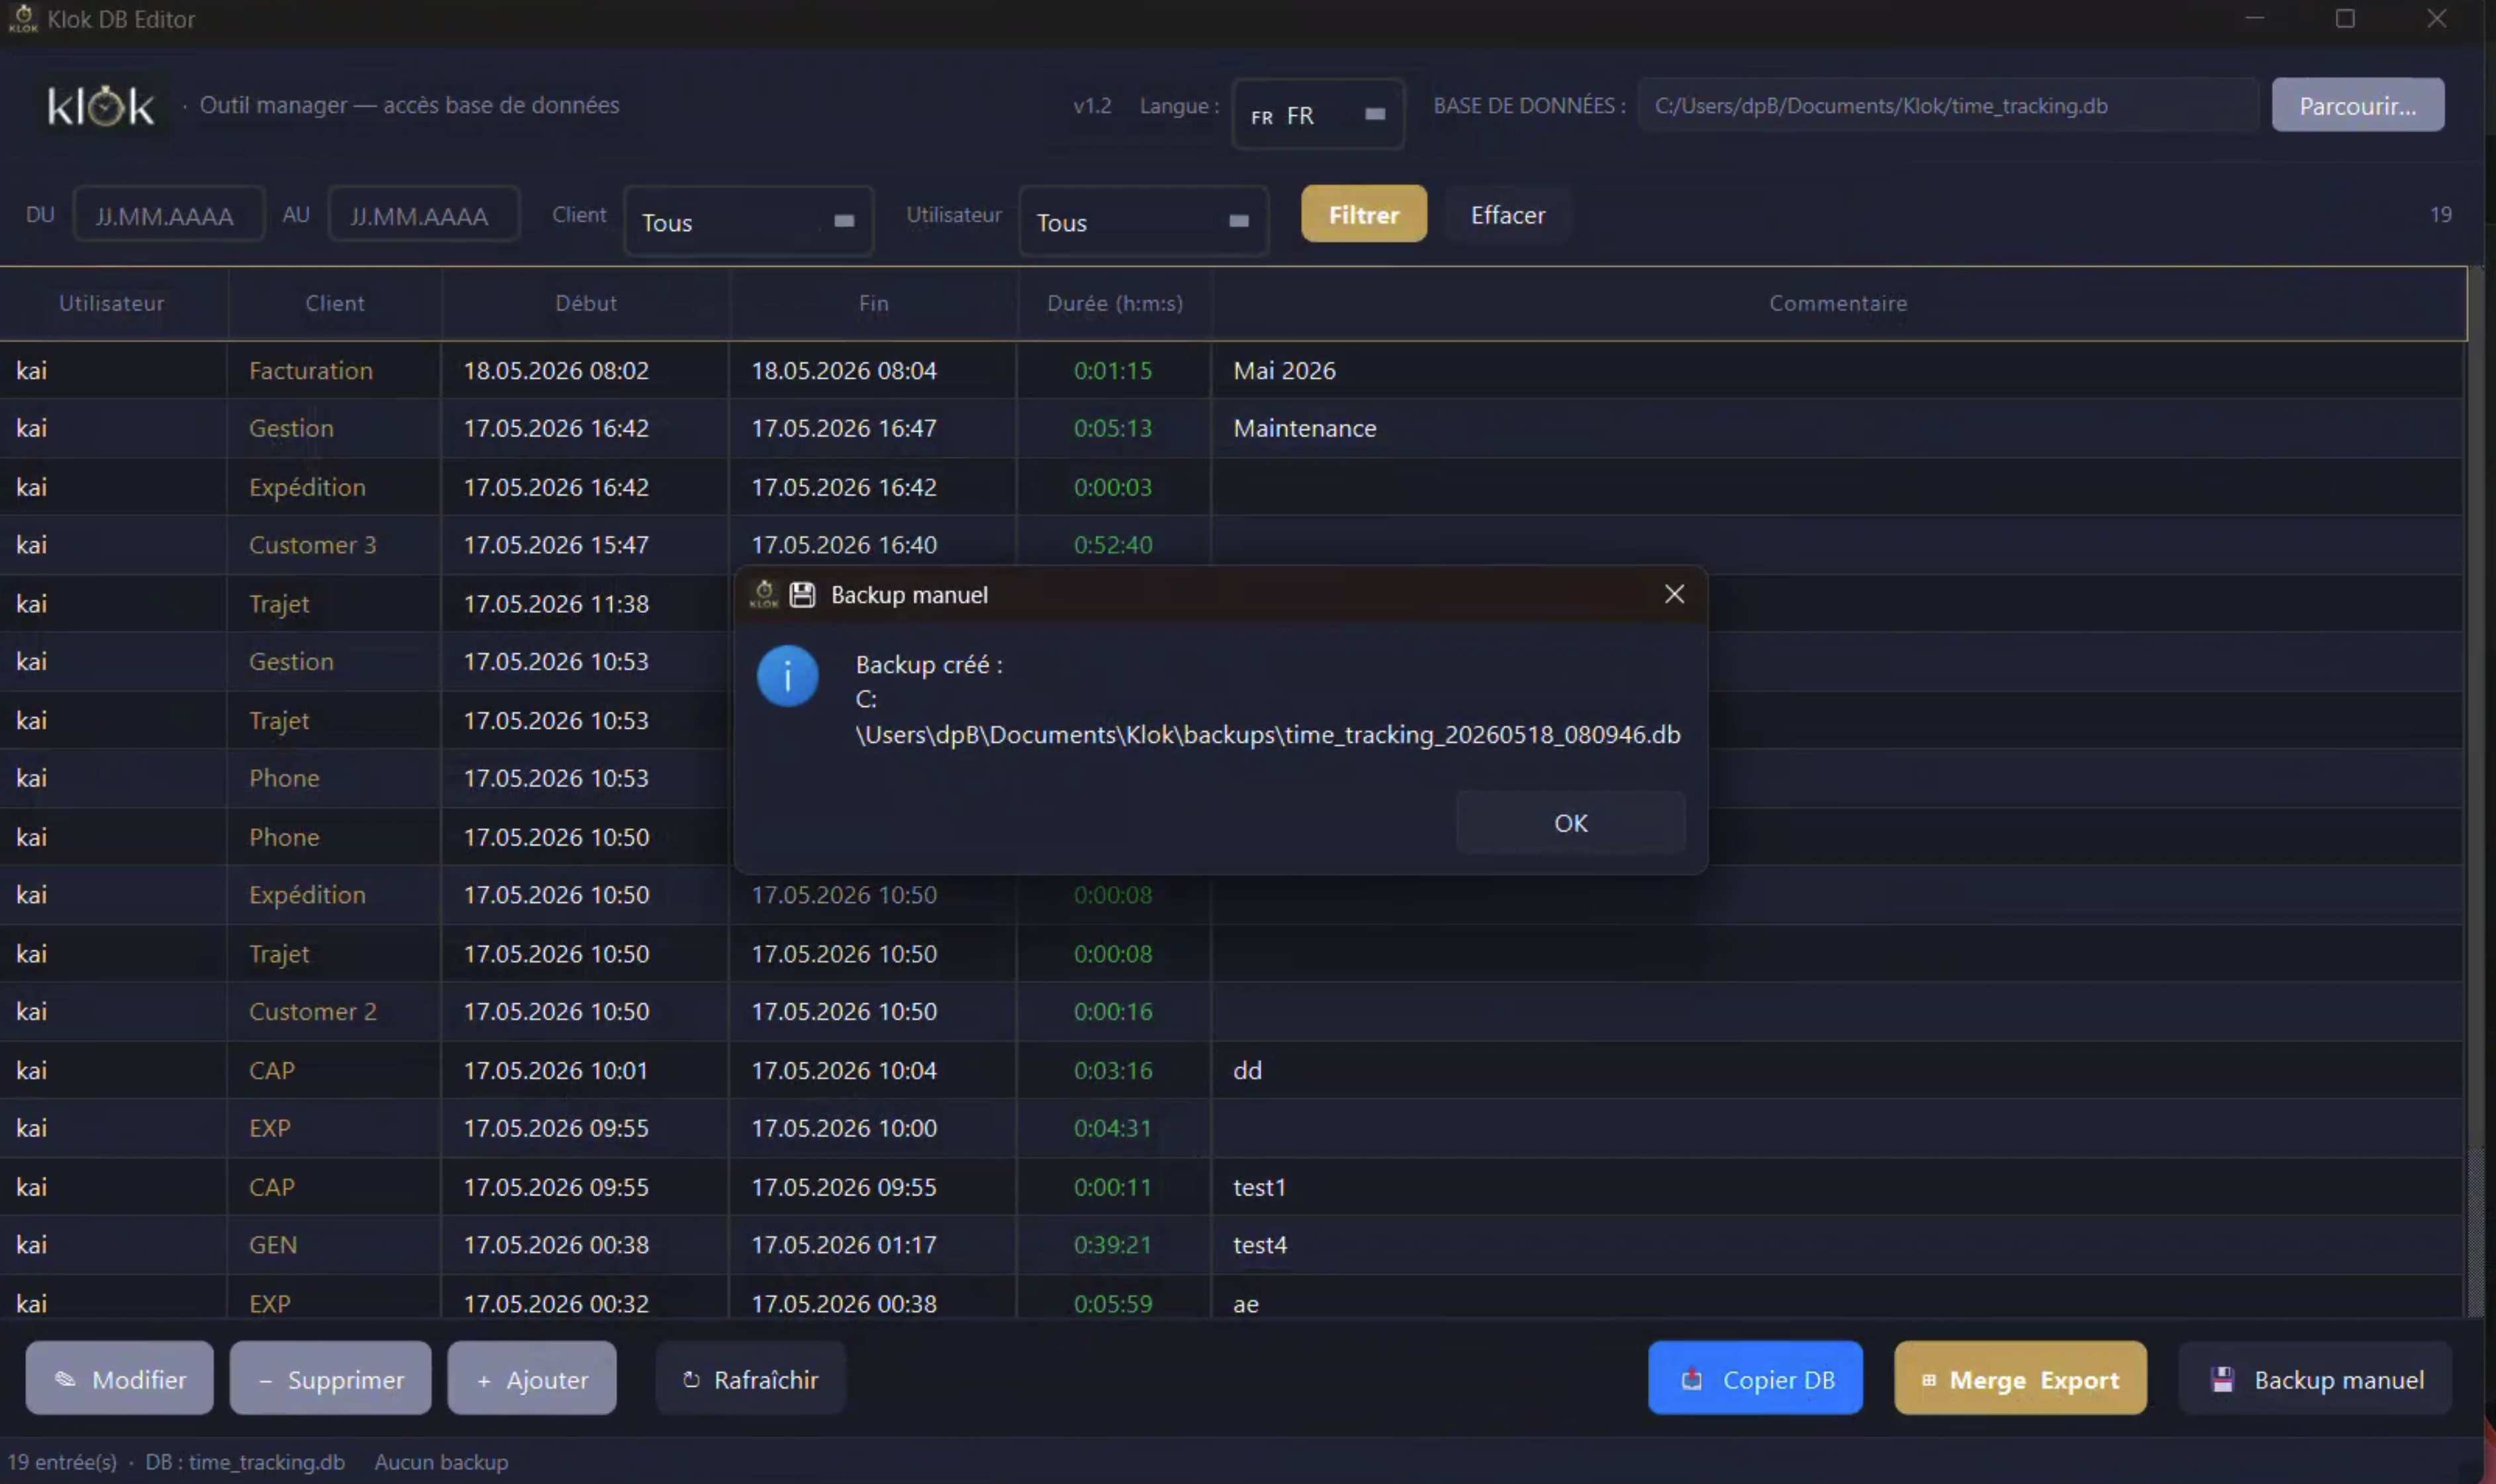
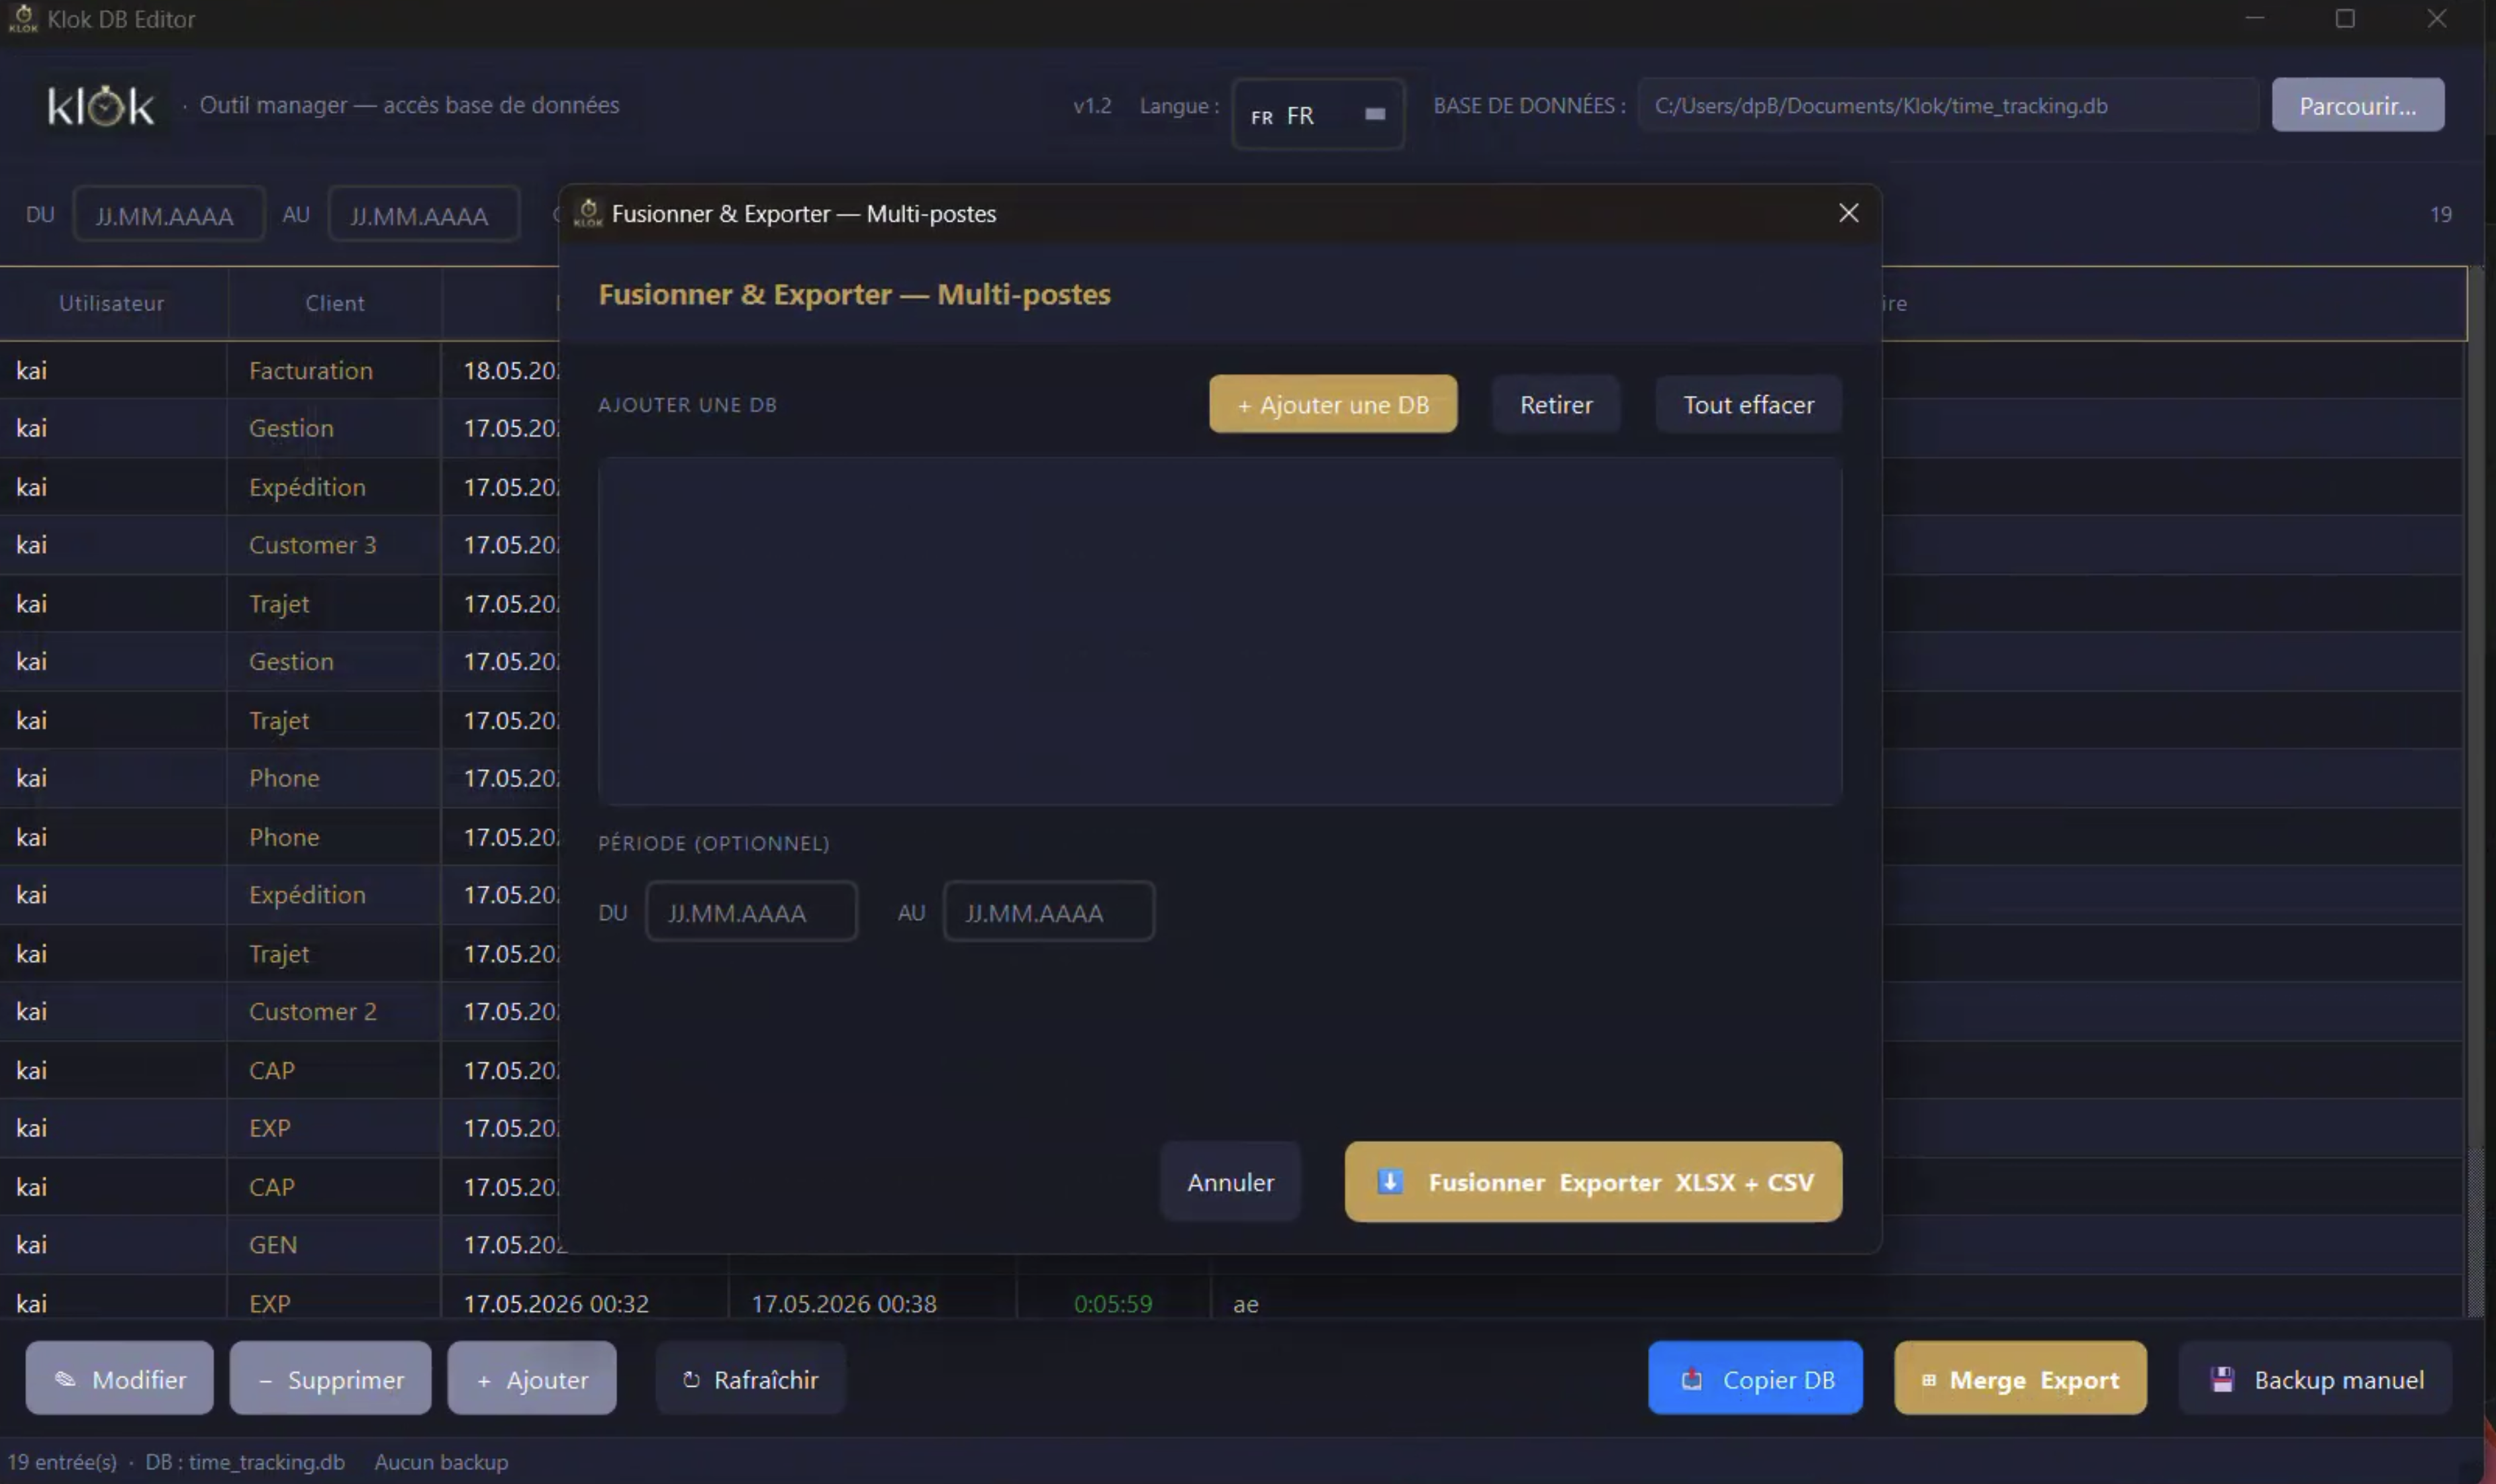
Klok Editor — Multi-postes — Klok Team
Klok Editor est un outil séparé destiné au responsable ou au manager. Il permet de fusionner les bases de données de plusieurs postes de travail, de les consulter et d'exporter un rapport consolidé.
Scénario typique — bureau avec plusieurs postes
- Sur chaque poste, Klok enregistre les heures dans son fichier
time_tracking.db. - En fin de mois, copiez les fichiers DB de chaque poste sur une clé USB.
- Sur le poste du manager, ouvrez Klok Editor et importez les fichiers DB.
- Klok Editor fusionne les données et génère un rapport XLSX consolidé (3 feuilles : Synthèse, Détail, Par utilisateur) ainsi qu'un CSV prêt pour Crésus, Sage ou Winbiz.
Klok Editor — Multi-Arbeitsplatz — Klok Team
Klok Editor ist ein separates Tool für den Verantwortlichen. Es ermöglicht das Zusammenführen von Datenbanken mehrerer Arbeitsplätze und den Export eines konsolidierten Berichts.
Typisches Szenario — Büro mit mehreren Arbeitsplätzen
- Jeder Arbeitsplatz speichert Stunden in seiner
time_tracking.db. - Monatlich: DB-Dateien von jedem Gerät auf USB-Stick kopieren.
- Auf dem Manager-Gerät Klok Editor öffnen und DB-Dateien importieren.
- Klok Editor führt die Daten zusammen und erstellt einen konsolidierten XLSX-Bericht (3 Blätter) sowie einen CSV für Crésus, Sage oder Winbiz.
Klok Editor — Multi-workstation — Klok Team
Klok Editor is a separate tool for the manager or administrator. It merges databases from multiple workstations and exports a consolidated report.
Typical scenario — office with multiple workstations
- Each workstation records hours in its own
time_tracking.dbfile. - At month end, copy each DB file to a USB drive.
- On the manager's workstation, open Klok Editor and import the DB files.
- Klok Editor merges the data and generates a consolidated XLSX report (3 sheets: Summary, Detail, Per user) plus a CSV ready for Crésus, Sage or Winbiz.
Klok Mobile — Bientôt disponible
Klok Mobile est la version smartphone de Klok, conçue pour les indépendants et artisans qui travaillent chez leurs clients. Même philosophie : données locales, aucun cloud, aucun abonnement.
Fonctionnalités prévues
- 📱 Suivi du temps sur iPhone et Android — même interface simple que Klok Desktop
- 🧾 Quittance rapide PDF — générez une quittance en un clic à la fin d'une prestation
- 💳 Paiement Twint intégré — envoyez une demande de paiement Twint directement depuis l'app
- 🔌 SumUp compatible — lancez un encaissement carte SumUp sans quitter l'app
- 🔄 Sync WiFi manuelle avec Klok Desktop — synchronisez vos heures une fois rentré au bureau, sans aucun cloud
- 🔒 Données 100% locales — rien n'est envoyé sur un serveur
À qui s'adresse Klok Mobile ?
Plombiers, électriciens, informaticiens, femmes de ménage, baby-sitters, consultants — tous ceux qui travaillent chez leurs clients et ont besoin de pointer leurs heures et d'encaisser sur le champ.
Prix et disponibilité
Klok Mobile sera disponible sur App Store (iPhone) et Google Play (Android) au prix de ~20–30 CHF (achat unique, sans abonnement).
Restez informé sur klokapp.ch ou contactez support@klokapp.ch pour être notifié à la sortie.
Klok Mobile — Demnächst verfügbar
Klok Mobile ist die Smartphone-Version von Klok, entwickelt für Selbstständige und Handwerker, die beim Kunden vor Ort arbeiten. Gleiche Philosophie: lokale Daten, keine Cloud, kein Abo.
Geplante Funktionen
- 📱 Zeiterfassung auf iPhone und Android — gleiche einfache Oberfläche wie Klok Desktop
- 🧾 Schnelle PDF-Quittung — Quittung per Knopfdruck nach jeder Leistung
- 💳 Twint-Zahlung integriert — Zahlungsanfrage direkt aus der App senden
- 🔌 SumUp-kompatibel — Kartenzahlung über SumUp starten ohne App-Wechsel
- 🔄 Manueller WiFi-Sync mit Klok Desktop — Stunden nach der Rückkehr ins Büro synchronisieren
- 🔒 100% lokale Daten — nichts wird an einen Server gesendet
Preis und Verfügbarkeit
Klok Mobile erscheint im App Store und Google Play für ca. 20–30 CHF (Einmalkauf, kein Abo).
Weitere Infos auf klokapp.ch oder per Mail an support@klokapp.ch.
Klok Mobile — Coming soon
Klok Mobile is the smartphone version of Klok, designed for freelancers and tradespeople who work on-site at clients' premises. Same philosophy: local data, no cloud, no subscription.
Planned features
- 📱 Time tracking on iPhone and Android — same simple interface as Klok Desktop
- 🧾 Quick PDF receipt — generate a receipt in one tap at the end of a job
- 💳 Twint payment built-in — send a Twint payment request directly from the app
- 🔌 SumUp compatible — launch a SumUp card payment without leaving the app
- 🔄 Manual WiFi sync with Klok Desktop — sync your hours when back at the office, no cloud involved
- 🔒 100% local data — nothing is sent to any server
Who is Klok Mobile for?
Plumbers, electricians, IT technicians, cleaners, babysitters, consultants — anyone who works at clients' premises and needs to track hours and collect payment on the spot.
Price and availability
Klok Mobile will be available on the App Store (iPhone) and Google Play (Android) for approximately CHF 20–30 (one-time purchase, no subscription).
Stay tuned at klokapp.ch or contact support@klokapp.ch to be notified at launch.